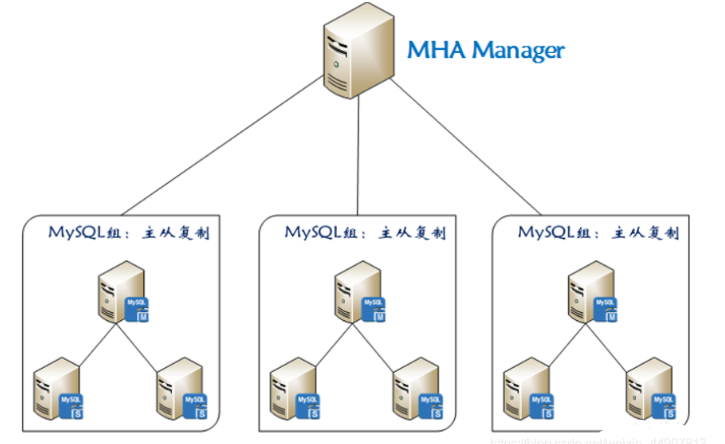
基础概念
基本操作见我的此篇博客Mysql
关系型数据课和非关系型数据库
关系型数据库:以多张二维表及他们之间的关系所组成
优点:
- 易于维护,结构一致
- sql语言通用,使用方便
- 支持单表和多表之间的复杂查询
缺点:
- 读写性能较差
- 固定表结构,灵活度稍欠
- 高并发读写需求对硬盘i/o造成很大罚单
非关系型数据库:以键值对(或者文档、图形等)来存储数据
优点:
- 基于键值对,数据间没有耦合性,可扩展性好
- 不需要sql层的解析,性能高
mysql常用参数:
-u:用户
-host:主机
-p:密码
--port:端口
-D:登录指定的数据库
工作流程
一个mysql进程实例=mysql后台守护进程+master 线程+worker 线程+预分配的内存.一台机子上可以启动多个mysql进程
连接方式
TCP/IP(远程)
mysql -uroot -pxxx -h 192.168.226.148 -P3306
socket
mysql -u -p -S /emp/mysql.sock
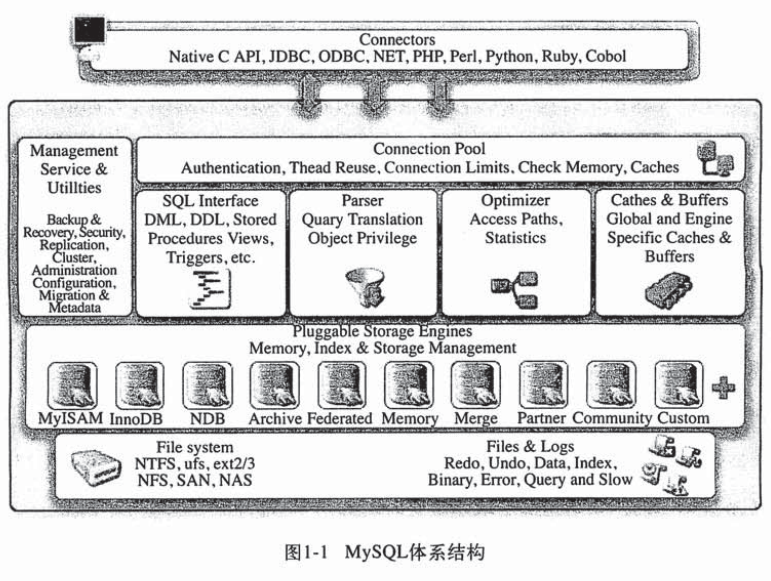
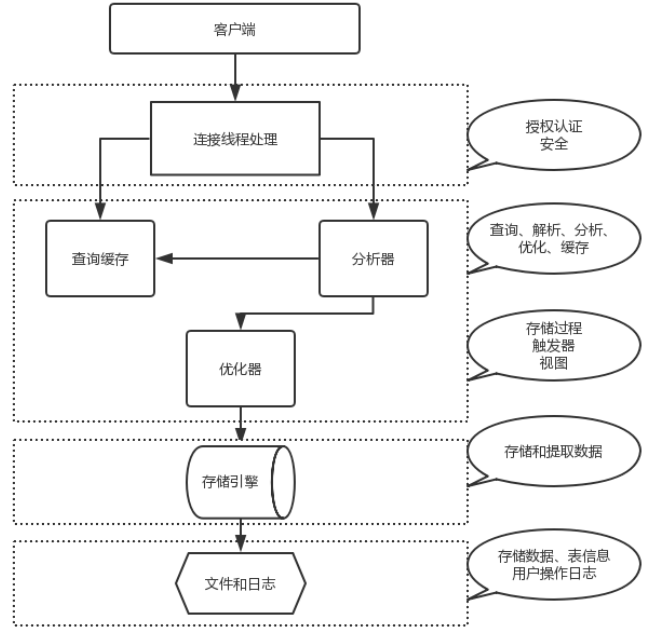
上层服务通过连接池组件来连接mysql。
- 提供连接协议:TCP/IP 、SOCKET
- 提供验证:用户、密码,IP,SOCKET
- 提供专用连接线程:接收用户SQL,返回结果
第二层包含mysql大部分核心服务,如查询分析优化缓存内置函数等,所有跨存储引擎功能都在这一层实现,如存储过程触发器视图等。
- 接收上层传送的SQL语句
- 语法验证模块:验证语句语法,是否满足SQL_MODE
语义检查:判断SQL语句的类型
- DDL :数据定义语言
- DCL :数据控制语言
- DML :数据操作语言
- DQL: 数据查询语言
- 权限检查:用户对库表有没有权限
- 解析器:对语句执行前,进行预处理,生成解析树(执行计划),说白了就是生成多种执行方案
- 优化器:根据解析器得出的多种执行计划,进行判断,选择最优的执行计划。代价模型:资源(CPU IO MEM)的耗损评估性能好坏
- 执行器:根据最优执行计划,执行SQL语句,产生执行结果
- 提供查询缓存(默认是没开启的),会使用redis tair替代查询缓存功能
- 提供日志记录(日志管理章节):binlog,默认是没开启的。
第三层是存储引擎,存储引擎负责mysql数据的存储和提取,服务器通过API和存储引擎进行通信。这些接口屏蔽了不同存储引擎之间的差异,使得这些差异对上层的查询过程透明化,但存储引擎一般不会去解析sql,不同存储引擎之间不会互相通信,只是简单的响应上层服务器的请求。mysql采用插件式结构的存储引擎,可以根据场景来选择不同的引擎,引擎对于上层应用程序和底层的文件系统都是透明的。
- 负责根据SQL层执行的结果,从磁盘上拿数据
- 将16进制的磁盘数据,交由SQL结构化化成表
- 连接层的专用线程返回给用户
第四层是文件系统,所有数据和日志最终以文件的形式存储在硬盘上
数据库:物理操作系统文件或者其他形式文件类型的集合
数据库实例:由数据库后台进程线程以及一个共享内存区组成,数据库实例才是真正用来操作数据库文件的,也即是说,数据库是由一个个文件组成的,而当要对这些文件执行select等操作的时候,就得要通过数据库实例来完成对数据库的操作
mysql区别于别的数据库最大的特点就是插件式的表存储引擎,这个插件式存储引擎架构提供了一系列标准的管理和服务,这些标准和存储引擎本身无关,是数据库系统本身所需,如sql分析器优化器等,而存储引擎是底层物理结构的实现。存储引擎是基于表的,而不是数据库
引擎
存储引擎的功能
- 数据读写
- 数据安全
- 提高性能
- 热备份
- 自动故障恢复
- 高可用方面支持
https://blog.csdn.net/qq_35642036/article/details/82820178
InnoDB与MyISAM的区别
InnoDB为什么推荐使用自增ID作为主键?
答:自增ID可以保证每次插入时B+索引是从右边扩展的,可以避免B+树和频繁合并和分裂(对比使用UUID)。如果使用字符串主键和随机主键,会使得数据随机插入,效率比较差。
innodb引擎的4大特性
插入缓冲(insert buffer),二次写(double write),自适应哈希索引(ahi),预读(read ahead)
MariaDB [(none)]> show engines\G;
*************************** 1. row ***************************
      Engine: InnoDB
     Support: DEFAULT
     Comment: Percona-XtraDB, Supports transactions, row-level locking, and foreign keys
Transactions: YES
          XA: YES
  Savepoints: YES
*************************** 2. row ***************************
      Engine: MRG_MYISAM
     Support: YES
     Comment: Collection of identical MyISAM tables
Transactions: NO
          XA: NO
  Savepoints: NO
*************************** 3. row ***************************
      Engine: MyISAM
     Support: YES
     Comment: Non-transactional engine with good performance and small data footprint
Transactions: NO
          XA: NO
  Savepoints: NO
*************************** 4. row ***************************
      Engine: BLACKHOLE
     Support: YES
     Comment: /dev/null storage engine (anything you write to it disappears)
Transactions: NO
          XA: NO
  Savepoints: NO
*************************** 5. row ***************************
      Engine: PERFORMANCE_SCHEMA
     Support: YES
     Comment: Performance Schema
Transactions: NO
          XA: NO
  Savepoints: NO
*************************** 6. row ***************************
      Engine: CSV
     Support: YES
     Comment: Stores tables as CSV files
Transactions: NO
          XA: NO
  Savepoints: NO
*************************** 7. row ***************************
      Engine: ARCHIVE
     Support: YES
     Comment: gzip-compresses tables for a low storage footprint
Transactions: NO
          XA: NO
  Savepoints: NO
*************************** 8. row ***************************
      Engine: MEMORY
     Support: YES
     Comment: Hash based, stored in memory, useful for temporary tables
Transactions: NO
          XA: NO
  Savepoints: NO
*************************** 9. row ***************************
      Engine: FEDERATED
     Support: YES
     Comment: Allows to access tables on other MariaDB servers, supports transactions and more
Transactions: YES
          XA: NO
  Savepoints: YES
*************************** 10. row ***************************
      Engine: Aria
     Support: YES
     Comment: Crash-safe tables with MyISAM heritage
Transactions: NO
          XA: NO
  Savepoints: NO
10 rows in set (0.00 sec)
索引
https://blog.csdn.net/guanyasu/article/details/53443142
索引的作用是加速查找,主键\unique\联合唯一\联合主键\index\联合index都是索引
当表中已有大量数据时,建立索引会占用大量磁盘空间且速度很慢,但是等建完后查询会变快
常用索引
普通索引INDEX:加速查找
唯一索引:
-主键索引PRIMARY KEY:加速查找+约束(不为空、不能重复)
-唯一索引UNIQUE:加速查找+约束(不能重复)
联合索引:
-PRIMARY KEY(id,name):联合主键索引
-UNIQUE(id,name):联合唯一索引
-INDEX(id,name):联合普通索引
创建方式
CREATE INDEX indexName ON table_name (column_name)创建

ALTER table tableName ADD INDEX indexName(columnName)修改

CREATE TABLE mytable(

ID INT NOT NULL,

username VARCHAR(16) NOT NULL,

INDEX [indexName] (username(length))

);  创建表时

DROP INDEX [indexName] ON mytable; 删除

CREATE UNIQUE INDEX indexName ON mytable(username(length)) 唯一索引
索引分类:B+树索引,hash索引
对比
MariaDB [db2]> select count(*) from s1;
+----------+
| count(*) |
+----------+
|  2999999 |
+----------+
1 row in set (2.02 sec)

MariaDB [db2]> create index a on s1(id);
Query OK, 0 rows affected (11.52 sec)
Records: 0  Duplicates: 0  Warnings: 0

MariaDB [db2]> select count(*) from s1;
+----------+
| count(*) |
+----------+
|  2999999 |
+----------+
1 row in set (1.23 sec)
b+树
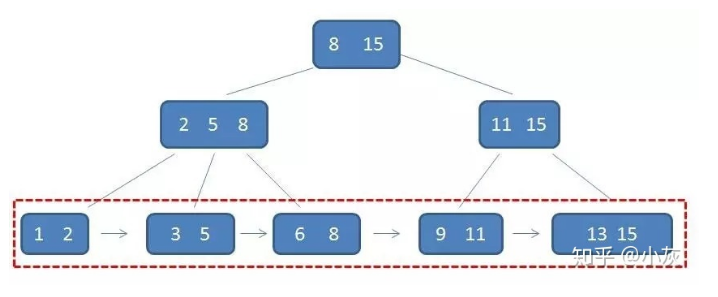
b+树数据全存在叶子节点,非叶子节点只放指向这些元素记录的指针(索引),父节点跟子节点重复的元素是这个子节点当中最大的元素,叶子节点的元素按从小到大的顺序依次排列,且互相之间有指针连在一起
b+树漫画,小仓鼠还挺可爱的
sql模型
ANSI QUOTES::宽松模式,对插入数据进行校验,如果不符合定义类型或长度,对数据类型调
整或截断保存,报warning警告。 双引号相当于反引号,只可以引用表名等字段名称,字符串只可
以使用单引号引用;
IGNORE_SPACE:在内建函数中忽略多余的空白字符;
STRICT_ALL_TABLES:如果没有设置这个值,非法的数据都允许存入,但是会有一个警告提示。如
果设置了,所有非法的数据都不允许填入,并且返回一个错误;
STRICT_TRANS_TABLES:向一个支持事务的表中插入非法数据的时候不允许,并且返回一个错
误;
TRADITIONAL:严格模式,当向mysql数据库插入数据时,进行数据的严格校验,保证错误数据不
能插入,报error错误。用于事物时,会进行事物的回滚


SELECT @@[GLOBAL | SESSION].sql_mode; 显示值
set GLOBAL | SESSION sql_mode=[值]; 修改值
事务
innodb引擎支持事务,事务保证一批sql语句要么全部执行,要么全部不执行(回滚),把数据库从一种一致性转换为另外一种一致性,来保证数据库的完整性.事务一般针对update,delete,insert
ACID
事务必须满足ACID特性:
- A:原子性,事务必须是执行任务的最小单位,事务要么成功要么撤回
- C:一致性,把数据库从一种一致性转换为另外一种一致性
- I:隔离性:每个事务之间是隔离的
- D:持久性:事务一旦执行,数据的修改是永久的
隔离等级
read uncommitted(未提交读):允许读取尚未提交的数据变更,可能会导致脏读、幻读或不可重复读
read conmitted (提交读):允许读取并发事务已经提交的数据,能够解决脏读
repeatable read (可重读):对同一字段的多次读取结果都是一致的,除非数据是被本身事务自己所修改,能够解决不可重复读、脏读现象
serializable(可串行化读):事务需要按串行化解决(MVCC)
格式
一个事务只能由commit(提交)或者rollback(回滚)结束,事务在执行过程中不是真的对数据进行了修改,在提交之前都是暂存于内存当中.当一个事务开启时,如果再开启另外一个事务,那么那个新开的事务会被卡住
begin;#开始
操作

commit/rollback
日志
错误日志log_error
存放数据库启动\关闭\日常中的状态信息错误警告等
MariaDB [db2]> show variables like "%log_error%";
+---------------+------------------------------+
| Variable_name | Value                        |
+---------------+------------------------------+
| log_error     | /var/log/mariadb/mariadb.log |
+---------------+------------------------------+
1 row in set (0.01 sec)
二进制日志binlog
备份、主从都依赖二进制日志,binlog位于sql层,记录变更数据的sql语句,不记录查询语句
二进制日志默认关闭,需要去配置文件手动开启
vim /etc/my.cnf
server_id=6 # 设置id
log_bin=mysql-bin # 开启并指定二进制日志目录及前缀名,记得关selinux
binlog_format=row # binlog 的日志记录格式
日志记录格式
SBR:可读性较高,日志量少,但是不够严谨
ROW:可读性很低,日志量大,足够严谨
event事件:二进制日志的最小记录单元
对于DDL(数据库定义语言,create等),DCL(数据库控制语言,grant等),一个语句就是一个event,对于DML(数据操纵,insert等),只记录已提交的事务
查看日志开启情况
MariaDB [(none)]> show variables like '%log_bin%';
+---------------------------------+-------+
| Variable_name                   | Value |
+---------------------------------+-------+
| log_bin                         | ON    |
| log_bin_trust_function_creators | OFF   |
| sql_log_bin                     | ON    |
+---------------------------------+-------+
查看二进制文件数量
MariaDB [(none)]> show binary logs;
+------------------+-----------+
| Log_name         | File_size |
+------------------+-----------+
| mysql-bin.000001 |       245 |
+------------------+-----------+
1 row in set (0.00 sec)

MariaDB [(none)]> flush logs;
Query OK, 0 rows affected (0.00 sec)

MariaDB [(none)]> show binary logs;
+------------------+-----------+
| Log_name         | File_size |
+------------------+-----------+
| mysql-bin.000001 |       288 |
| mysql-bin.000002 |       245 |
+------------------+-----------+
2 rows in set (0.00 sec)
查看正在使用的二进制文件
MariaDB [(none)]> show master status;
+------------------+----------+--------------+------------------+
| File             | Position | Binlog_Do_DB | Binlog_Ignore_DB |
+------------------+----------+--------------+------------------+
| mysql-bin.000002 |      245 |              |                  |
+------------------+----------+--------------+------------------+
1 row in set (0.01 sec)
查看日志内容
MariaDB [(none)]> show binlog events in 'mysql-bin.000002';
+------------------+-----+-------------+-----------+-------------+-------------------------------------------+
| Log_name         | Pos | Event_type  | Server_id | End_log_pos | Info                                      |
+------------------+-----+-------------+-----------+-------------+-------------------------------------------+
| mysql-bin.000002 |   4 | Format_desc |         6 |         245 | Server ver: 5.5.68-MariaDB, Binlog ver: 4 |
+------------------+-----+-------------+-----------+-------------+-------------------------------------------+
1 row in set (0.00 sec)
详细查看日志内容
[root@server1 ~]# mysqlbinlog --base64-output=decode-rows -vvv /data/binlog/mysql-bin.000002
基于position进行日志截取
mysqlbinlog --start-position=219 --stop-position=1347 /data/binlog/mysql-bin.000003 >/tmp/bin.sql
使用二进制日志进行数据恢复
创建一个库表,往里面放点数据
MariaDB [db1]> show binlog events in 'mysql-bin.000002';
+------------------+-----+-------------+-----------+-------------+-------------------------------------------+
| Log_name         | Pos | Event_type  | Server_id | End_log_pos | Info                                      |
+------------------+-----+-------------+-----------+-------------+-------------------------------------------+
| mysql-bin.000002 |   4 | Format_desc |         6 |         245 | Server ver: 5.5.68-MariaDB, Binlog ver: 4 |
| mysql-bin.000002 | 245 | Query       |         6 |         326 | create database db1                       |
| mysql-bin.000002 | 326 | Query       |         6 |         412 | use `db1`; create table tb1(id int)       |
| mysql-bin.000002 | 412 | Query       |         6 |         479 | BEGIN                                     |
| mysql-bin.000002 | 479 | Table_map   |         6 |         520 | table_id: 33 (db1.tb1)                    |
| mysql-bin.000002 | 520 | Write_rows  |         6 |         564 | table_id: 33 flags: STMT_END_F            |
| mysql-bin.000002 | 564 | Xid         |         6 |         591 | COMMIT /* xid=18 */                       |
+------------------+-----+-------------+-----------+-------------+-------------------------------------------+
7 rows in set (0.00 sec)

MariaDB [db1]> select * from tb1;
+------+
| id   |
+------+
|    1 |
|    2 |
|    3 |
+------+
MariaDB [db1]> drop database db1;# 模拟故障
Query OK, 1 row affected (0.01 sec)

MariaDB [(none)]> show master status; #查看正在使用的二进制日志
+------------------+----------+--------------+------------------+
| File             | Position | Binlog_Do_DB | Binlog_Ignore_DB |
+------------------+----------+--------------+------------------+
| mysql-bin.000002 |      670 |              |                  |
+------------------+----------+--------------+------------------+
1 row in set (0.00 sec)

MariaDB [(none)]> show binlog events in 'mysql-bin.000002';
+------------------+-----+-------------+-----------+-------------+-------------------------------------------+
| Log_name         | Pos | Event_type  | Server_id | End_log_pos | Info                                      |
+------------------+-----+-------------+-----------+-------------+-------------------------------------------+
| mysql-bin.000002 |   4 | Format_desc |         6 |         245 | Server ver: 5.5.68-MariaDB, Binlog ver: 4 |
| mysql-bin.000002 | 245 | Query       |         6 |         326 | create database db1                       |
| mysql-bin.000002 | 326 | Query       |         6 |         412 | use `db1`; create table tb1(id int)       |
| mysql-bin.000002 | 412 | Query       |         6 |         479 | BEGIN                                     |
| mysql-bin.000002 | 479 | Table_map   |         6 |         520 | table_id: 33 (db1.tb1)                    |
| mysql-bin.000002 | 520 | Write_rows  |         6 |         564 | table_id: 33 flags: STMT_END_F            |
| mysql-bin.000002 | 564 | Xid         |         6 |         591 | COMMIT /* xid=18 */                       |
| mysql-bin.000002 | 591 | Query       |         6 |         670 | drop database db1                         |
+------------------+-----+-------------+-----------+-------------+-------------------------------------------+
8 rows in set (0.00 sec)

[root@server1 ~]# mysqlbinlog --start-position=245 --stop-position=591 /var/lib/mysql/mysql-bin.000002  > /tmp/bin2.sql
[root@server1 ~]# ll /tmp/bin2.sql
-rw-r--r--. 1 root root 2265 3月  12 11:03 /tmp/bin2.sql

MariaDB [(none)]> set sql_log_bin=0;#暂时关闭记录
Query OK, 0 rows affected (0.00 sec)

MariaDB [(none)]> source /tmp/bin2.sql;
Query OK, 0 rows affected (0.00 sec)
MariaDB [db1]> set sql_log_bin = 1;
Query OK, 0 rows affected (0.00 sec)MariaDB [db1]> show databases;
+--------------------+
| Database           |
+--------------------+
| information_schema |
| db1                |
| mysql              |
| performance_schema |
+--------------------+
慢日志slow_log
记录比较慢的sql语句,默认关闭,需要通过修改配置文件来开启
[root@server1 ~]# vim /etc/my.cnf

slow_query_log=1
slow_query_log_file = /var/log/mariadb/slow.log
long_query_time=0.1
log_queries_not_using_indexes

[root@server1 ~]# systemctl restart mariadb.service
MariaDB [(none)]> show variables like "%slow%";
+---------------------+--------------------------------------------------------------------------------------------------------------+
| Variable_name       | Value                                                                                                        |
+---------------------+--------------------------------------------------------------------------------------------------------------+
| log_slow_filter     | admin,filesort,filesort_on_disk,full_join,full_scan,query_cache,query_cache_miss,tmp_table,tmp_table_on_disk |
| log_slow_queries    | ON                                                                                                           |
| log_slow_rate_limit | 1                                                                                                            |
| log_slow_verbosity  |                                                                                                              |
| slow_launch_time    | 2                                                                                                            |
| slow_query_log      | ON                                                                                                           |
| slow_query_log_file | /var/log/mariadb/slow.log                                                                                    |
+---------------------+--------------------------------------------------------------------------------------------------------------+
主从复制
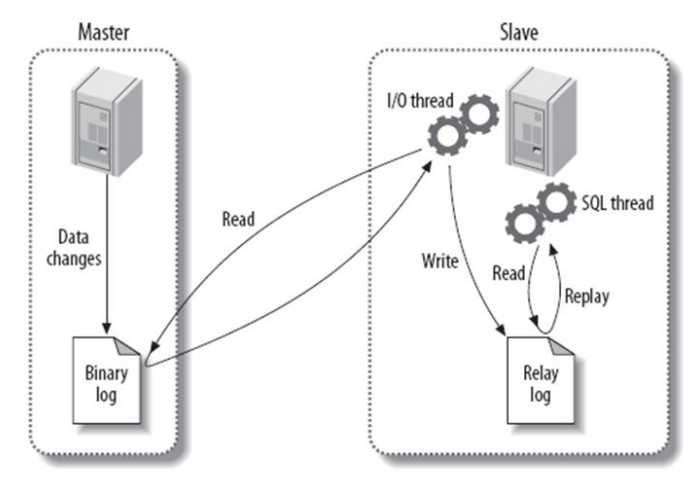
主服务器上的更新操作会被写入二进制文件中,从服务器用io线程去读主的二进制日志,然后写道relaylog里,sql线程会去执行relaylog。而对从服务器操作不会对主造成影响
主从的三种模式:https://zhuanlan.zhihu.com/p/307288925
https://zhuanlan.zhihu.com/p/521863168
实验
两台机器,一主一从
主
vim /etc/my.conf

server_id=1
log_bin=mysql-bin
binlog_format=row

重启服务

#创建主从复制用户
MariaDB [(none)]> grant replication slave on *.* to rep@'192.168.226.%' identified by '123';
Query OK, 0 rows affected (0.00 sec)

MariaDB [(none)]> show master status;
+------------------+----------+--------------+------------------+
| File             | Position | Binlog_Do_DB | Binlog_Ignore_DB |
+------------------+----------+--------------+------------------+
| mysql-bin.000003 |     2971 |              |                  |
+------------------+----------+--------------+------------------+
从
vim /etc/my.cnf
server_id =2 #不能和主一样

systemctl restart mariadb.service 12345

MariaDB [(none)]> change master to master_host='192.168.226.148',master_port=3306,master_user='rep',master_password='123',master_log_file='mysql-bin.000003',master_log_pos=2971;

MariaDB [(none)]> start slave;
Query OK, 0 rows affected (0.00 sec)

MariaDB [(none)]> show slave status\G;
*************************** 1. row ***************************
               Slave_IO_State: Waiting for master to send event
                  Master_Host: 192.168.226.148
                  Master_User: rep
                  Master_Port: 3306
                Connect_Retry: 60
              Master_Log_File: mysql-bin.000003
          Read_Master_Log_Pos: 2971
               Relay_Log_File: mariadb-relay-bin.000002
                Relay_Log_Pos: 529
        Relay_Master_Log_File: mysql-bin.000003
             Slave_IO_Running: Yes
            Slave_SQL_Running: Yes
              Replicate_Do_DB:
          Replicate_Ignore_DB:
           Replicate_Do_Table:
       Replicate_Ignore_Table:
      Replicate_Wild_Do_Table:
  Replicate_Wild_Ignore_Table:
                   Last_Errno: 0
                   Last_Error:
                 Skip_Counter: 0
          Exec_Master_Log_Pos: 2971
              Relay_Log_Space: 825
              Until_Condition: None
               Until_Log_File:
                Until_Log_Pos: 0
           Master_SSL_Allowed: No
           Master_SSL_CA_File:
           Master_SSL_CA_Path:
              Master_SSL_Cert:
            Master_SSL_Cipher:
               Master_SSL_Key:
        Seconds_Behind_Master: 0
Master_SSL_Verify_Server_Cert: No
                Last_IO_Errno: 0
                Last_IO_Error:
               Last_SQL_Errno: 0
               Last_SQL_Error:
  Replicate_Ignore_Server_Ids:
             Master_Server_Id: 1
1 row in set (0.00 sec)

ERROR: No query specified
验证
从
MariaDB [(none)]> show databases;
+--------------------+
| Database           |
+--------------------+
| information_schema |
| mysql              |
| performance_schema |
+--------------------+
3 rows in set (0.00 sec)
主
MariaDB [(none)]> create database db1;
Query OK, 1 row affected (0.01 sec)

从
MariaDB [(none)]> show databases;
+--------------------+
| Database           |
+--------------------+
| information_schema |
| db1                |
| mysql              |
| performance_schema |
+--------------------+
4 rows in set (0.00 sec)
备份
备份分类
按照备份数据位置分类
  热备:硬盘以及内存中的⼀些数据进⾏备份
  冷备:数据库硬盘中的数据
按照备份后⽂件的内容
  逻辑备份:⼀般内容分是sql语句
  裸⽂件备份:拷⻉数据库的物理文件,⼀般内容是⼆进制数据
按照备份数据的内容
  完全备份:对数据库进⾏⼀个完整的备份
  增量备份:在上次的完全备份基础上对更新的数据进⾏备份
  ⽇志备份:⼆进制⽇志备份-->当数据库宕机之后进⾏数据恢复的依据

冷备份的优点:
  备份简单,只要拷⻉相关⽂件即可
  易于跨平台
  恢复简单,只要把⽂件恢复到相关位置即可
  恢复速度快,不需要执⾏任何sql语句,也不需要重新建索引
冷备份缺点
  冷备⽂件通常⽐逻辑⽂件⼤很多
  不是总可以轻易跨平台
逻辑备份:
  mysqldump
  selcet * into outfile 'path/to/file' from tbname;
mysqldump
参数
-B:连接多个库
-A:备份所有库
-d:只备份表结构,没有行数据
-t:之备份行数据,没有表结构
-F:刷新binlog
-l:锁定所有表为只读
备份
mysqldump 库名 > /路径/文件
mysqldump -B 库名 库名2 库名3 > /xxx/xx.sql
mysqldump -B 库 | gzip> 文件  #gzip压缩
mysqldump 数据库名 表名1 表名2 … > 备份文件名 #备份表
恢复
mysql 库名< 文件#库名必须存在,且要与原来库名一致
source 文件 #必须处在那个数据库里
实例
[root@server1 ~]# mysqldump tb1 > tb1.sql
mysqldump: Got error: 1045: "Access denied for user 'root'@'localhost' (using password: NO)" when trying to connect
[root@server1 ~]# mysqldump tb1 -p123456 > tb1.sql
[root@server1 ~]# ll
总用量 12
-rw-------. 1 root root 1241 1月  12 10:11 anaconda-ks.cfg
-rw-r--r--. 1 root root 6335 3月  11 21:22 tb1.sql

MariaDB [(none)]> drop database tb1;
Query OK, 6 rows affected (0.00 sec)

MariaDB [(none)]> create database db1;
Query OK, 1 row affected (0.00 sec)

MariaDB [(none)]> use db1;
Database changed
MariaDB [db1]> source tb1.sql

MariaDB [db1]> show tables;
+---------------+
| Tables_in_db1 |
+---------------+
| employee      |
| t1            |
| t2            |
| t3            |
| t4            |
| t5            |
+---------------+
6 rows in set (0.00 sec)
配置文件
#[client] 客户端配置
#port  = 3306客户端默认连接端口

[mysqld]
datadir=/var/lib/mysql#数据库数据文件存放目录
socket=/var/lib/mysql/mysql.sock#为mysql客户端和服务器之间的本地通讯指定一个套接字文件
#user = mariadb mysql启动用户
#basedir= 安装目录
# Disabling symbolic-links is recommended to prevent assorted security risks
symbolic-links=0
# Settings user and group are ignored when systemd is used.
# If you need to run mysqld under a different user or group,
# customize your systemd unit file for mariadb according to the
# instructions in http://fedoraproject.org/wiki/Systemd

[mysqld_safe]
log-error=/var/log/mariadb/mariadb.log
pid-file=/var/run/mariadb/mariadb.pid

#
# include all files from the config directory
#
!includedir /etc/my.cnf.d

~
~
~
~
"/etc/my.cnf" 19L, 570C
子配置文件
[root@server1 ~]# ls /etc/my.cnf.d/
client.cnf  mysql-clients.cnf  server.cnf
架构
部署
安装mariadb
yum install mariadb-server.x86_64 -y

[root@server1 ~]# systemctl start mariadb.service
[root@server1 ~]# mysql_secure_installation

NOTE: RUNNING ALL PARTS OF THIS SCRIPT IS RECOMMENDED FOR ALL MariaDB
      SERVERS IN PRODUCTION USE!  PLEASE READ EACH STEP CAREFULLY!

In order to log into MariaDB to secure it, we'll need the current
password for the root user.  If you've just installed MariaDB, and
you haven't set the root password yet, the password will be blank,
so you should just press enter here.

Enter current password for root (enter for none):
OK, successfully used password, moving on...

Setting the root password ensures that nobody can log into the MariaDB
root user without the proper authorisation.

Set root password? [Y/n]
New password:
Re-enter new password:
Password updated successfully!
Reloading privilege tables..
 ... Success!


By default, a MariaDB installation has an anonymous user, allowing anyone
to log into MariaDB without having to have a user account created for
them.  This is intended only for testing, and to make the installation
go a bit smoother.  You should remove them before moving into a
production environment.

Remove anonymous users? [Y/n]
 ... Success!

Normally, root should only be allowed to connect from 'localhost'.  This
ensures that someone cannot guess at the root password from the network.

Disallow root login remotely? [Y/n]
 ... Success!

By default, MariaDB comes with a database named 'test' that anyone can
access.  This is also intended only for testing, and should be removed
before moving into a production environment.

Remove test database and access to it? [Y/n]
 - Dropping test database...
 ... Success!
 - Removing privileges on test database...
 ... Success!

Reloading the privilege tables will ensure that all changes made so far
will take effect immediately.

Reload privilege tables now? [Y/n]
 ... Success!

Cleaning up...

All done!  If you've completed all of the above steps, your MariaDB
installation should now be secure.

Thanks for using MariaDB!

systemctl start mariadb.service

mysql -uroot -p密码
修改管理员密码
正常修改
[root@server1 ~]# mysqladmin -uroot -p password
Enter password:旧密码
New password:
Confirm new password:
忘记密码
[root@server1 ~]# systemctl stop mariadb.service
[root@server1 ~]# mysqld_safe --skip-grant-tables --skip-networking &
[1] 7435

[root@server1 ~]# mysql
Welcome to the MariaDB monitor.  Commands end with ; or \g.
Your MariaDB connection id is 1
Server version: 5.5.68-MariaDB MariaDB Server

Copyright (c) 2000, 2018, Oracle, MariaDB Corporation Ab and others.

Type 'help;' or '\h' for help. Type '\c' to clear the current input statement.

MariaDB [(none)]> use mysql
Reading table information for completion of table and column names
You can turn off this feature to get a quicker startup with -A

Database changed
MariaDB [mysql]> flush privileges;
Query OK, 0 rows affected (0.00 sec)

MariaDB [mysql]> grant all on *.* to root@'localhost' identified by '123456';
Query OK, 0 rows affected (0.01 sec)
# 这一步也可以用于给其他ip账户远程登陆授权
MariaDB [mysql]> flush privileges;
Query OK, 0 rows affected (0.00 sec)

MariaDB [mysql]> exit
Bye
[root@server1 ~]# pkill mysqld
[root@server1 ~]# systemctl restart mariadb
[1]+  完成                  mysqld_safe --skip-grant-tables --skip-networking
[root@server1 ~]# mysql -uroot -p123456
基础操作
库的增查改删
\G可以将结果以竖排的方式显示
# 查
MariaDB [(none)]> show databases;
+--------------------+
| Database           |
+--------------------+
| information_schema |
| mysql              |
| performance_schema |
+--------------------+
3 rows in set (0.00 sec)

# 增
MariaDB [(none)]> create database db1 charset utf8;
Query OK, 1 row affected (0.00 sec)

MariaDB [(none)]> show databases;
+--------------------+
| Database           |
+--------------------+
| information_schema |
| db1                |
| mysql              |
| performance_schema |
+--------------------+
4 rows in set (0.01 sec)
# 查看详细的建库指令
MariaDB [(none)]> show create database db1;
+----------+--------------------------------------------------------------+
| Database | Create Database                                              |
+----------+--------------------------------------------------------------+
| db1      | CREATE DATABASE `db1` /*!40100 DEFAULT CHARACTER SET utf8 */ |
+----------+--------------------------------------------------------------+
1 row in set (0.00 sec)


# 修改编码
MariaDB [(none)]> alter database db1 charset utf8;
Query OK, 1 row affected (0.00 sec)

# 使用这个数据库
use db1

# 删除数据库
drop database db1;
表的操作
切换表
use tablesname;
增:create table name(字段 类型,字段 类型);
查:show tables;
查看结构:describe/desc tablename;
查看创建时的配置:MariaDB [db1]> show create table tb1;

改:
增加字段:
alter table tablename modify 字段 类型;
改名
alter table tablename change 字段1 新字段1 旧/新类型 [完整性约束条件];
改表名
alter table tablename rename newtablename;
删除字段
alter table tablename drop 字段;
修改顺序
alter table tablename add 字段 类型 [完整性] first/(after 字段名)
alter table tablename change 字段 旧名 新名 新类型 [完整性] first/after


删:drop table tablename

指定引擎:create......ENGINE=xxx
alter tablename ai engine = xxx
表的约束规则
NOT NULL:非空
create table tb1 (id int not null);
default:设置默认值
create table tb1 (id int nut null default 111);
UNIQUE:唯一
create table tb1(id int unique);
create table t1(id int unique not null,ip int unique not null);
MariaDB [tb1]> desc t1;
+-------+---------+------+-----+---------+-------+
| Field | Type    | Null | Key | Default | Extra |
+-------+---------+------+-----+---------+-------+
| id    | int(11) | NO   | PRI | NULL    |       |
| ip    | int(11) | NO   | UNI | NULL    |       |
+-------+---------+------+-----+---------+-------+
2 rows in set (0.00 sec)
#当一个值同时not null 和unique,先创建的那个会成为主键(innodb)

MariaDB [tb1]> create table t2(id int primary key auto_increment,ip int not null,host char(10) not null,unique(ip,host));#联合unique,host+ip组合不能相同
MariaDB [tb1]> desc  t2;
+-------+----------+------+-----+---------+----------------+
| Field | Type     | Null | Key | Default | Extra          |
+-------+----------+------+-----+---------+----------------+
| id    | int(11)  | NO   | PRI | NULL    | auto_increment |
| ip    | int(11)  | NO   | MUL | NULL    |                |
| host  | char(10) | NO   |     | NULL    |                |
+-------+----------+------+-----+---------+----------------+
3 rows in set (0.00 sec)
auto_increment
create table tb3(id int auto_increament primary key);自增且必须为主键

create table student( id int primary key auto_increment, name varchar(20), sex enum('male','female') default 'male' )auto_increment=3;设置步长

alter atble student auto_increment=3;
set session auth_increment_increment=2 #修改会话级别的步长

set session auto_increment_offset=5;设置自增的初始值,会话级,如果,offset比increment_increment的值大,offset会被忽略
什么时候会导致自增主键不连续:
1.插入值造成唯一键冲突(如插入自增id=10,但表里面已经有10了,插入失败,但是执行器会对自增键+1)
2.事务添加自增+1,之后回滚,数据被清除,自增没有
3.添加的数据,使用delete删除后,仍然按照删除前的位置增长,所以应该用truncate清空表
truncate tablename
primary key:主键,主键不可空不可重复,可以是单一字段,也可以是多字段组合
1. not null + unique 的第一个会被当成主键
create table department1( id int not null unique, #主键 name varchar(20) not null unique, comment varchar(100) );
2.primary key
create table department2( id int primary key, #主键 name varchar(20), comment varchar(100) );
3.单独指定
create table t4(id int, name varchar(20), comment varchar(100), primary key(id));
4.添加约束
alter table department4 modify id int primary key;
5.unique+not null联合主键
MariaDB [tb1]> create table t3(id int not null,ip int not null,phone int not null,unique(id,phone));
Query OK, 0 rows affected (0.01 sec)

MariaDB [tb1]> desc t3;
+-------+---------+------+-----+---------+-------+
| Field | Type    | Null | Key | Default | Extra |
+-------+---------+------+-----+---------+-------+
| id    | int(11) | NO   | PRI | NULL    |       |
| ip    | int(11) | NO   |     | NULL    |       |
| phone | int(11) | NO   | PRI | NULL    |       |
+-------+---------+------+-----+---------+-------+
foreign key:外键,参照自另外一个表的唯一性索引。两个表必须都是innodb表,外键列必须建了索引,4.1.12版本后在建立外键时会自动创建索引;外键关系的两个列必须是数据类型相似,即可以互相转换类型的列
MariaDB [tb1]> desc t1;
+-------+---------+------+-----+---------+-------+
| Field | Type    | Null | Key | Default | Extra |
+-------+---------+------+-----+---------+-------+
| id    | int(11) | NO   | PRI | NULL    |       |
| ip    | int(11) | NO   | UNI | NULL    |       |
+-------+---------+------+-----+---------+-------+
2 rows in set (0.01 sec)

MariaDB [tb1]> create table t5(name varchar(10),user_id int,foreign key(user_id) references t1(id));
Query OK, 0 rows affected (0.00 sec)

MariaDB [tb1]> desc t5;
+---------+-------------+------+-----+---------+-------+
| Field   | Type        | Null | Key | Default | Extra |
+---------+-------------+------+-----+---------+-------+
| name    | varchar(10) | YES  |     | NULL    |       |
| user_id | int(11)     | YES  | MUL | NULL    |       |
+---------+-------------+------+-----+---------+-------+
2 rows in set (0.00 sec)

create table employee( id int primary key, name varchar(20) not null, dpt_id int, foreign key(dpt_id) references department(id) on delete cascade # 级连删除 on update cascade # 级连更新 )engine=innodb;
值的操作
增:insert into tablename [(字段1,字段2...)]values(值1,值2),(),()...;#如果不写字段默认为全部
删:delete from tablename where 条件;
清空整张表:truncate tablename;
改:update tablename set 字段=值 where 条件;
查:select xx from tablename 条件
用户管理
用户格式:用户名@'白名单'
root@'192.168.226.148'
root@'192.168.226.%'
root@'localhost'
root@'server1'
root@'192.168.226.0/255.255.255.0'
添加、查看用户
mysql.user
MariaDB [db1]> create user [email protected] identified by '1';
Query OK, 0 rows affected (0.00 sec)

MariaDB [db1]> select user,host,password from mysql.user;
+-------+-----------------+-------------------------------------------+
| user  | host            | password                                  |
+-------+-----------------+-------------------------------------------+
| root  | localhost       | *6BB4837EB74329105EE4568DDA7DC67ED2CA2AD9 |
| root  | 127.0.0.1       | *6BB4837EB74329105EE4568DDA7DC67ED2CA2AD9 |
| root  | ::1             | *6BB4837EB74329105EE4568DDA7DC67ED2CA2AD9 |
| test1 | 192.168.226.150 | *E6CC90B878B948C35E92B003C792C46C58C4AF40 |
+-------+-----------------+-------------------------------------------+
4 rows in set (0.00 sec)
修改用户密码
MariaDB [mysql]> update user set password=password('123') where user='test1' and host='192.168.226.150';
Query OK, 1 row affected (0.00 sec)
Rows matched: 1  Changed: 1  Warnings: 0
删除用户
drop user 用户名@host;
权限管理
权限类型
ALL: SELECT,INSERT, UPDATE, DELETE, CREATE, DROP, RELOAD, SHUTDOWN, PROCESS, FILE, REFERENCES, INDEX, ALTER, SHOW DATABASES, SUPER, CREATE TEMPORARY TABLES, LOCK TABLES, EXECUTE, REPLICATION SLAVE, REPLICATION CLIENT, CREATE VIEW, SHOW VIEW, CREATE ROUTINE, ALTER ROUTINE, CREATE USER, EVENT, TRIGGER, CREATE TABLESPACE
ALL : 以上所有权限,一般是普通管理员拥有的
with grant option:超级管理员才具备的,给别的用户授权的功能
权限管理
授权:grant 权的种类 on 库.表 to 用户 identified by '密码'
grant all on *.* to root@'192.168.226.%' identified by '123456';


查看授权:show grants for 用户
回收:revoke 权的种类 on 库.表  from 用户
刷新:flush privileges
内容管理
这里只列举部分,其他请看我前一篇博客
查询
语法
SELECT DISTINCT [group_concat,聚合,join,union]字段1,字段2... FROM 表名
WHERE 条件[算数运算符,IN,NOT IN,NOT,any,exists,not exists,and,or] ,可以出现任何字段,但不能有聚合
GROUP BY field
HAVING 筛选 ,因为在分组后,可以用聚合,只能用分组后的字段
ORDER BY field [asc,desc]
LIMIT 开始,单次最大输出数   #限制条数
优先级
from
where
group by
select
distinct
having
order by
limit
1.找到表:from
2.拿着where指定的约束条件,去文件/表中取出一条条记录
3.将取出的一条条记录进行分组group by,如果没有group by,则整体作为一组
4.执行select(去重)
5.将分组的结果进行having过滤
6.将结果按条件排序:order by
7.限制结果的显示条数
查询关键字
between
SELECT emp_name,salary FROM employee WHERE post='teacher' AND salary>10000;

SELECT emp_name,salary FROM employee WHERE salary NOT BETWEEN 10000 AND 20000;
is null
SELECT emp_name,post_comment FROM employee WHERE post_comment IS NULL;

SELECT emp_name,post_comment FROM employee WHERE post_comment IS NOT NULL;
in
SELECT emp_name,salary FROM employee WHERE salary IN (3000,3500,4000,9000) ;
LIKE模糊查询
通配符’%’ #配任意多个
SELECT * FROM employee
WHERE emp_name LIKE 'eg%';

通配符’_’ #配一个
SELECT * FROM employee
WHERE emp_name LIKE 'al__';
综合案例
create database db1 charset utf8;

use db1

create table department( id int primary key, name varchar(20) not null )engine=innodb character set utf8;

insert into department values (1,'教质部'), (2,'技术部'), (3,'人力资源部');

create table employee( id int primary key, name varchar(20) not null, dpt_id int, foreign key(dpt_id) references department(id)
    -> on delete cascade
    -> on update cascade
    -> )engine=innodb character set utf8;

insert into employee values (1,'yuan',1), (2,'nezha',2), (3,'egon',2), (4,'alex',2), (5,'wusir',3), (6,'李沁洋',3), (7,'皮卡丘',3), (8,'程咬金',3), (9,'程咬银',3) ;
级联删除
MariaDB [db1]> select * from employee;
+----+-----------+--------+
| id | name      | dpt_id |
+----+-----------+--------+
|  1 | yuan      |      1 |
|  2 | nezha     |      2 |
|  3 | egon      |      2 |
|  4 | alex      |      2 |
|  5 | wusir     |      3 |
|  6 | 李沁洋    |      3 |
|  7 | 皮卡丘    |      3 |
|  8 | 程咬金    |      3 |
|  9 | 程咬银    |      3 |
+----+-----------+--------+
9 rows in set (0.00 sec)

MariaDB [db1]> select * from department;
+----+-----------------+
| id | name            |
+----+-----------------+
|  1 | 教质部          |
|  2 | 技术部          |
|  3 | 人力资源部      |
+----+-----------------+
3 rows in set (0.00 sec)

MariaDB [db1]> delete from department where id=2;
Query OK, 1 row affected (0.00 sec)
MariaDB [db1]> select * from department;
+----+-----------------+
| id | name            |
+----+-----------------+
|  1 | 教质部          |
|  3 | 人力资源部      |
+----+-----------------+
2 rows in set (0.00 sec)

MariaDB [db1]> select * from employee;
+----+-----------+--------+
| id | name      | dpt_id |
+----+-----------+--------+
|  1 | yuan      |      1 |
|  5 | wusir     |      3 |
|  6 | 李沁洋    |      3 |
|  7 | 皮卡丘    |      3 |
|  8 | 程咬金    |      3 |
|  9 | 程咬银    |      3 |
+----+-----------+--------+
6 rows in set (0.00 sec)
级联修改
MariaDB [db1]> update department set id=2 where id=3;
Query OK, 1 row affected (0.00 sec)
Rows matched: 1  Changed: 1  Warnings: 0

MariaDB [db1]> select * from employee;
+----+-----------+--------+
| id | name      | dpt_id |
+----+-----------+--------+
|  1 | yuan      |      1 |
|  5 | wusir     |      2 |
|  6 | 李沁洋    |      2 |
|  7 | 皮卡丘    |      2 |
|  8 | 程咬金    |      2 |
|  9 | 程咬银    |      2 |
+----+-----------+--------+
6 rows in set (0.00 sec)

MariaDB [db1]> select * from department;
+----+-----------------+
| id | name            |
+----+-----------------+
|  1 | 教质部          |
|  2 | 人力资源部      |
+----+-----------------+
2 rows in set (0.00 sec)
