matsudaira 发布的文章

RBAC是基于角色来控制访问的机制,通过rbac.authorization.k8s.io 这个api来实现
RBAC会涉及的资源大致分为三类:
角色(Role,ClusterRole):本质是权限的集合,角色并不是真正意义上的用户,而是像一种权限模板,他规定了采用这个模板的用户能够拥有怎样的权限,角色权限设定里面没有“拒绝”。Role需要指定namespace,二Cluster是集群范围的
主体/作用对象(subject):规定了创建的用户他的权限生效范围,包含User、Group、Service Account这三种类型
角色绑定(RoleBinding,ClusterRoleBingding):将创建好的用户和主题绑定在一起,RoleBinding限定在namespace,而Cluster是集群范围的

https://kubernetes.io/zh-cn/docs/reference/access-authn-authz/rbac/
https://blog.yingchi.io/posts/2020/7/k8s-rbac.html
https://www.qikqiak.com/post/use-rbac-in-k8s/

标准实例

Role

apiVersion: rbac.authorization.k8s.io/v1
kind: Role
metadata:
  namespace: default
  name: pod-reader
rules:
- apiGroups: [""] #  资源组,"" 缺省为 core 组资源,其它诸如 apps 等;
  resources: ["pods"] #资源,比如 pods、deployments、services、secrets 等  
  verbs: ["get", "watch", "list"] #操作动词,如 get、list、watch、create、delete、update 等。

ClusterRole

apiVersion: rbac.authorization.k8s.io/v1
kind: ClusterRole
metadata:
  # "namespace" 被忽略,因为 ClusterRoles 不受名字空间限制
  name: secret-reader
rules:
- apiGroups: [""]
  # 在 HTTP 层面,用来访问 Secret 资源的名称为 "secrets"
  resources: ["secrets"]
  verbs: ["get", "watch", "list"]

RoleBingding

一个 RoleBinding 可以引用同一的名字空间中的任何 Role
RoleBinding 也可以引用 ClusterRole,以将对应 ClusterRole 中定义的访问权限授予 RoleBinding 所在名字空间的资源,以实现角色复用

apiVersion: rbac.authorization.k8s.io/v1
# 此角色绑定允许 "jane" 读取 "default" 名字空间中的 Pod
# 你需要在该命名空间中有一个名为 “pod-reader” 的 Role
kind: RoleBinding
metadata:
  name: read-pods
  namespace: default
subjects:
# 你可以指定不止一个“subject(主体)”
- kind: User
  name: jane # "name" 是区分大小写的
  apiGroup: rbac.authorization.k8s.io
roleRef:
  # "roleRef" 指定与某 Role 或 ClusterRole 的绑定关系
  kind: Role        # 此字段必须是 Role 或 ClusterRole
  name: pod-reader  # 此字段必须与你要绑定的 Role 或 ClusterRole 的名称匹配
  apiGroup: rbac.authorization.k8s.io
apiVersion: rbac.authorization.k8s.io/v1
# 此角色绑定使得用户 "dave" 能够读取 "development" 名字空间中的 Secrets
# 你需要一个名为 "secret-reader" 的 ClusterRole
kind: RoleBinding
metadata:
  name: read-secrets
  # RoleBinding 的名字空间决定了访问权限的授予范围。
  # 这里隐含授权仅在 "development" 名字空间内的访问权限。
  namespace: development
subjects:
- kind: User
  name: dave # 'name' 是区分大小写的
  apiGroup: rbac.authorization.k8s.io
roleRef:
  kind: ClusterRole
  name: secret-reader
  apiGroup: rbac.authorization.k8s.io

ClusterRoleBingding

apiVersion: rbac.authorization.k8s.io/v1
# 此集群角色绑定允许 “manager” 组中的任何人访问任何名字空间中的 Secret 资源
kind: ClusterRoleBinding
metadata:
  name: read-secrets-global
subjects:
- kind: Group
  name: manager      # 'name' 是区分大小写的
  apiGroup: rbac.authorization.k8s.io
roleRef:
  kind: ClusterRole
  name: secret-reader
  apiGroup: rbac.authorization.k8s.io

绑定示例

Role+RoleBingding

apiVersion: rbac.authorization.k8s.io/v1
# 此角色绑定使得用户 "dave" 能够读取 "development" 名字空间中的 Secrets
# 你需要一个名为 "secret-reader" 的 ClusterRole
kind: RoleBinding
metadata:
  name: read-secrets
  # RoleBinding 的名字空间决定了访问权限的授予范围。
  # 这里隐含授权仅在 "development" 名字空间内的访问权限。
  namespace: development
subjects:
- kind: User
  name: dave # 'name' 是区分大小写的
  apiGroup: rbac.authorization.k8s.io
roleRef:
  kind: ClusterRole
  name: secret-reader
  apiGroup: rbac.authorization.k8s.io

ClusterRole+RoleBingding

kind: RoleBinding
apiVersion: rbac.authorization.k8s.io/v1
metadata:
  name: pods-reader-binding
  namespace: ns-a
subjects:
- kind: User
  name: yingchi
  apiGroup: rbac.authorization.k8s.io
roleRef:
  kind: ClusterRole
  name: pod-reader
  apiGroup: rbac.authorization.k8s.io

jenkins官方示例

---
apiVersion: rbac.authorization.k8s.io/v1
kind: ClusterRole
metadata:
  name: jenkins-admin
rules:
  - apiGroups: [""]
    resources: ["*"]
    verbs: ["*"]
---
apiVersion: v1
kind: ServiceAccount
metadata:
  name: jenkins-admin
  namespace: devops-tools
---
apiVersion: rbac.authorization.k8s.io/v1
kind: ClusterRoleBinding
metadata:
  name: jenkins-admin
roleRef:
  apiGroup: rbac.authorization.k8s.io
  kind: ClusterRole
  name: jenkins-admin
subjects:
- kind: ServiceAccount
  name: jenkins-admin
  namespace: devops-tools
https://github.com/amitsaha/prom-file-sd-config-generator

功能比较单一,就是从url使用http GET请求获取一个资源列表,然后自动把他解析成json写进文件,需要提前配置好prometheus基于文件的自动发现功能

GET返回的格式类似于

<a href="http://127.0.0.1:9100/metrics/testitem1">target1</a>
<a href="http://127.0.0.1:9200/metrics/testitem2">target2</a>
<a href="http://127.0.0.1:9300/metrics/testitem3">target3</a>

使用示例

准备一个响应请求的程序

package main

import (
    "fmt"
    "net/http"
    "os"

    "github.com/gin-gonic/gin"
)

type targetlist []string

func port() string {
    port := os.Getenv("PORT")
    if len(port) == 0 {
        port = "8088"
    }
    return ":" + port
}

var list1 = targetlist{`<a href="http://127.0.0.1:9090/metrics">localhost</a>`,
    `<a href="http://172.29.36.125:9100/metrics">ser2</a>`}

func main() {
    engine := gin.Default()
    engine.GET("/list", func(c *gin.Context) {
        str := ""
        for _, item := range list1 {
            str = str + "\n" + item

        }
        fmt.Println(str)
        c.String(http.StatusOK, str)
    })

    engine.Run(port())
}

运行程序

./prom-file-sd-config-generator --config-path /var/file-sd.json --target-source "http://127.0.0.1:8088/list"

#一共就三个参数
#--config-path json文件地址
#--target-source  响应url
#--scrape-interval int  采集间隔,默认5s

有docker 镜像,使用方法和上面一样,挂参数就行
image.png
没看到有更改标签相关的功能,而且还得自己开发响应程序,感觉不实用

本文主要是对官方手册的解读,加上了一点基于实际压测后对方案的感受
https://yunlzheng.gitbook.io/prometheus-book/part-ii-prometheus-jin-jie/readmd/prometheus-local-storage

存储

架构

prometheus 2.x版本以两小时为一个周期,每个周期落盘记录为一个block,block下面有chunk样本数据、metadata元数据、index索引数据
未落盘的数据保存在内存中,如果发生意外导致应用崩溃,恢复的时候会从写入日志(WAL)中读取并重播以恢复数据,在此期间如果发生过删除数据的操作,也会被记录在逻辑文件tombstones
这种以时间段来分段的方式有利于数据的查询以及简化删除过期数据的逻辑
普罗米修斯中单个指标样本约占1-3字节,当然,在其可靠的压缩算法之下能变得更小(按fb的算法能压缩到 1.37 bytes 每个点,我们测在3左右),2.x版本甚至专门对ssd的读写性能和次数进行了优化,感动人心。存储大小的计算公式为

needed_disk_space = retention_time_seconds * ingested_samples_per_second * bytes_per_sample

如果保留时间和指标本身不变动的话,从ingested_samples_per_second(每秒采样总数)想要压缩存储成本就两个方法:
1.延长采样间隔
2.减少指标
prometheus压缩算法参考了fb的Gorilla tsdb,有兴趣可以研究一下

关于WAL机制更详细的介绍

data/
├── 01GCDV01N8T74K4HE9JRD7PNQP #block,命名采用ULID:全局字典可排序ID
│   ├── chunks #样本,单块最大512M
│   │   └── 000001
│   ├── index #索引
│   ├── meta.json #元数据
│   └── tombstones #逻辑
├── 01GCDYC64PDTMA62ZMT73GEX8S
│   ├── chunks
│   │   └── 000001
│   ├── index
│   ├── meta.json
│   └── tombstones
├── chunks_head
│   └── 000002
├── lock
├── queries.active
└── wal #写入日志
    ├── 00000000
    ├── 00000001
    ├── 00000002
    └── 00000003

内存中存放的数据,每满三个小时,会被分成2h和1h的一块,2h的那块落盘,1h的那块继续留在内存,数据在写入内存的同时也会被写入wal以确保持久性
内存中的存储结构我们叫其head_block,当获取到新的数据,会写入其中的head_chunk,chunk也是唯一能够被写入的地方。这个chunk每当样本数达到设定的值或者range达到设定的值的时候就会被剪切,然后新增一个新的chunk,旧的chunk被称为“full”,从2.19开始,一个full的chunk会被写入磁盘并通过内存映射引用在内存中,当需要用到的时候可以动态加载进来,当达到上面说的3h时,其中2h的chunk会被压缩成block落盘,wal中的数据也会形成checkpoint截断旧的数据,这个检查点将会检查这些被截断的数据,看看他们是否满足被删除的条件
新版本的普罗米修斯支持wal压缩,这将大大减少磁盘和内存的开销----旧版本可能会出现因为wal数据过多而导致硬盘和内存占用过大,可以参考这篇https://asktug.com/t/topic/512888/2 最最好的解决方法是升级版本

一篇压测文:https://www.percona.com/blog/2018/09/20/prometheus-2-times-series-storage-performance-analyses/

远程存储

虽然prometheus本身就支持本地存储,但是如果想要数据持久化,可以考虑外接influxdb搞个远程存储,只需要调用(remote_write/remote_read)这两个接口就可以实现远程存储的读写
对于远程读取,prometheus会对数据用promQL进行二次处理,另外,因为promtheus只有数据是放数据库的,规则等都是通过配置文件实现的,所以启用远程读设置后,只在数据查询时有效,对于规则文件的处理,以及Metadata API的处理都只基于Prometheus本地存储完成。
开启这两个功能只需要修改普罗米修斯的配置文件就行

remote_write:
    url: <string>
    [ remote_timeout: <duration> | default = 30s ]
    write_relabel_configs:
    [ - <relabel_config> ... ]
    basic_auth:
    [ username: <string> ]
    [ password: <string> ]
    [ bearer_token: <string> ]
    [ bearer_token_file: /path/to/bearer/token/file ]
    tls_config:
    [ <tls_config> ]
    [ proxy_url: <string> ]

remote_read:
    url: <string>
    required_matchers:
    [ <labelname>: <labelvalue> ... ]
    [ remote_timeout: <duration> | default = 30s ]
    [ read_recent: <boolean> | default = false ]
    basic_auth:
    [ username: <string> ]
    [ password: <string> ]
    [ bearer_token: <string> ]
    [ bearer_token_file: /path/to/bearer/token/file ]
    [ <tls_config> ]
    [ proxy_url: <string> ]

普罗米修斯现在也支持一些第三方的存储,所以上面说能够influxdb是基于这个原因,至于实现方式看上面的手册,这里不再复制粘贴

高可用:套娃方案

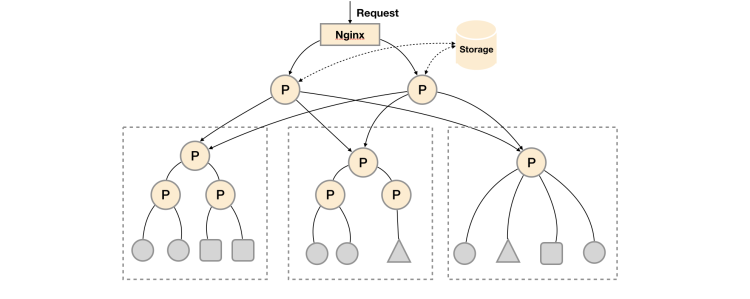
官方给出了三套高可用方案,不过其实本质上就是一套,分成了丐中丐版、丐版、完全版而已

对于大量数据的处理,官方给的方案是这套,用nginx负载均衡来保障可用性,两个大P的数据是一样的,挂了一个还有一个,小p们通过relabel设置分功能去收集或者随便咋分,总之采了数据上交给大P,以此来保证应对大量数据时的采集性能。最后再外挂个远程存储来实现数据持久化存储
image.png

image.png
所谓联邦集群,本质其实是部署多套普罗米修斯收集数据,最后再用一个普罗米修斯从这些个小p身上汇总数据

以上三部分可以按需选择,各自解决一部分问题

(方案挺不错的,不过我选择prometheus+thanos
https://github.com/thanos-io/thanos/tree/main/

官方的这套联邦方案,看起来很美好,但是实际测试下来性能很差,数据量大不推荐使用,毕竟他下面小弟汇总,再去拉取,这个数据量大了必卡(测下来别说亿级,百万级、大几十万级都会翻白眼直接超时),而且普罗米修斯本身的性能瓶颈也导致了即便是提高机器配置也很难提升多少性能

这就不得不提到另外一个著名的社区方案:thanos。比如布两套一样的普罗米修斯去采集事务再用thanos去查。这个方案和联邦方案的区别在于,单个pod采集上来的数据量本身是比较小的,虽然汇总起来很大,但是对于普罗米修斯来说就等于是在并行处理许多的小任务,这个普罗米修斯完全是可以做到的。而联邦集群的方案会导致大P去拉取小p的数据时,一次性的把小p获取到的所有数据打包拉了上来,等于在并行处理几个超巨大的任务,饭一口一口吃多吃几碗没问题,一口吃一碗会把人给噎死

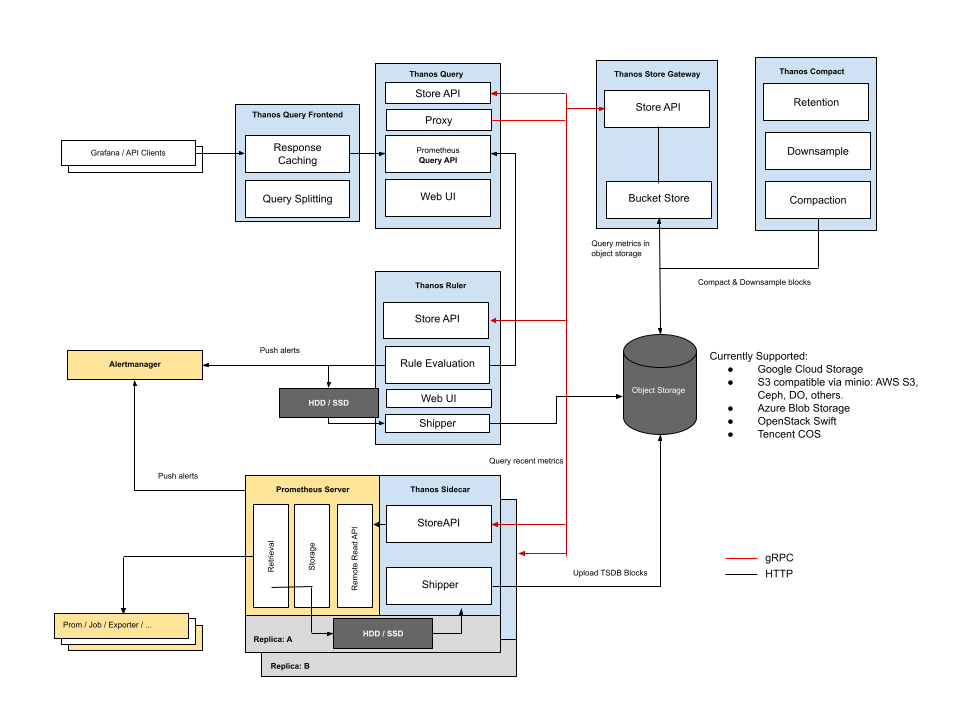
Thanos

https://github.com/thanos-io/thanos/tree/main/

灭霸,可靠的开源高可用方案(笑

因为买的服务器过期了,所以这里安装就不演示了
avatar

thanos能无缝兼容promtheus,并且易于水平横向扩容,翻译成人话就是,要是一对prometheus拉不了所有的数据,可以把数据分组,用多组prometheus分别去拉
avatar
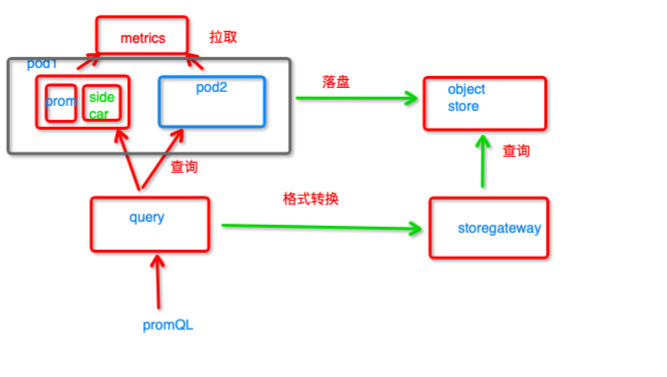
简单架构说明:

sidecar和prometheus布一个pod里面,他将prometheus的已落盘的数据上传到对象存储,将grpc的调用转换为http,请求prometheus查询并返回数据,可以像上面一样布两个promtheus去拉一样的数据,起到高可用的作用

query提供查询接口,当在prometheus数据保存期内就从sidecar查,如果超过保质期就去对象存储查,拿到结果后去重返回

object store对象存储,数据在结果compact组件(图上没画)压缩后存入对象存储,提供了数据持久化功能

storegateway提供查询语句转换功能,把promQL转换成对象存储能够理解的语句再发给他

虽然已落盘的数据在pod和obj里面都有,但是除非超过保质期,不然都是从pod里面查而非obj,对象存储的查询性能很差
thanos还有些其他的组件,像rule之类的,这里就不讲了

docker pull prom/node-exporter

node-exporter.yaml

apiVersion: apps/v1 
kind: DaemonSet #daemonset会保证每个node都有这个pod
metadata:
  name: node-exporter
  namespace: promtest
spec:
  selector: 
    matchLabels: 
      app: node-exporter
  template:
    metadata:
      labels:
        app: node-exporter
    spec:
      hostPID: true
      hostIPC: true
      hostNetwork: true
      containers:
      - name: node-exporter
        image: prom/node-exporter
        imagePullPolicy: IfNotPresent
        ports:
        - containerPort: 9100
          hostPort: 9100
        resources:
          requests:
            cpu: 100m
            memory: 100Mi
          limits:
            cpu: 2000m
            memory: 2Gi        
        securityContext:
          privileged: true
        args:
        - --path.procfs
        - /host/proc
        - --path.sysfs
        - /host/sys
        - --path.rootfs
        - /host/root
        - --collector.filesystem.ignored-mount-points
        - '"^/(sys|proc|dev|host|etc)($|/)"'
        - "--collector.processes"
        volumeMounts:
        - name: dev
          mountPath: /host/dev
        - name: proc
          mountPath: /host/proc
        - name: sys
          mountPath: /host/sys
        - name: rootfs
          mountPath: /host/root
      tolerations: #污点容忍
      - key: "node-role.kubernetes.io/master"
        operator: "Exists"
        effect: "NoSchedule"
      volumes:
        - name: proc
          hostPath:
            path: /proc
        - name: dev
          hostPath:
            path: /dev
        - name: sys
          hostPath:
            path: /sys
        - name: rootfs
          hostPath:
            path: /
#如果要在容器环境中部署node-exporter,需要将主机的根节点绑定到容器环境,不然在查询磁盘等参数时,数据是不准确的

node-ser.yaml

kind: Service
apiVersion: v1
metadata:
  name: node-ser
  namespace: promtest
  labels:
    app: node-exporter
spec:
  ports:
  - name: metricsa
    port: 9100
    protocol: TCP
    targetPort: 9100
  selector:
    app: node-exporter

helm是k8s的包管理工具

安装

https://github.com/helm/helm/releases

  1. 解压(tar -zxvf helm-v3.0.0-linux-amd64.tar.gz)
  2. 在解压目中找到helm程序,移动到需要的目录中(mv linux-amd64/helm /usr/local/bin/helm)

入门

chart的结构一般如下

mychart/
  Chart.yaml
  values.yaml
  charts/
  templates/
  ...

templates/ 目录包括了模板文件。当Helm评估chart时,会通过模板渲染引擎将所有文件发送到templates/目录中。 然后收集模板的结果并发送给Kubernetes。
values.yaml 文件也导入到了模板。这个文件包含了chart的 默认值 。这些值会在用户执行helm install 或 helm upgrade时被覆盖。
Chart.yaml 文件包含了该chart的描述。你可以从模板中访问它。charts/目录 可以 包含其他的chart(称之为 _子chart_)。(描述性的,一般这个文件不用怎么管

你可以使用helm create chartname来快速创建一个项目文件夹,里面包含了一个完整的结构,甚至包含了一些预生成的模版,如下

[root@master linux-amd64]# helm create testlist
[root@master testlist]# ll
total 16
drwxr-xr-x 2 root root 4096 Sep  1 14:34 charts
-rw-r--r-- 1 root root 1144 Sep  1 14:34 Chart.yaml
drwxr-xr-x 3 root root 4096 Sep  1 14:34 templates
-rw-r--r-- 1 root root 1875 Sep  1 14:34 values.yaml

[root@master testlist]# ll templates/
total 32
-rw-r--r-- 1 root root 1841 Sep  1 14:34 deployment.yaml
-rw-r--r-- 1 root root 1792 Sep  1 14:34 _helpers.tpl
-rw-r--r-- 1 root root  919 Sep  1 14:34 hpa.yaml
-rw-r--r-- 1 root root 2081 Sep  1 14:34 ingress.yaml
-rw-r--r-- 1 root root 1751 Sep  1 14:34 NOTES.txt
-rw-r--r-- 1 root root  322 Sep  1 14:34 serviceaccount.yaml
-rw-r--r-- 1 root root  364 Sep  1 14:34 service.yaml
drwxr-xr-x 2 root root 4096 Sep  1 14:34 tests
[root@master testlist]# ll templates/tests/
total 4
-rw-r--r-- 1 root root 382 Sep  1 14:34 test-connection.yaml

你可以把他们全部删除然后写你自己的,你也可以在这些文件的基础上进行修改,helm官方有一些别人已经写好的helm,你可以helm pull把他们拉下来,但是一般实际环境还是得要根据自己的需求去写

常用指令

helm create chartname 创建一个helm工程文件夹
helm package path 打包一个helm版本包
helm lint path 验证chart
helm uninstall release_name 卸载一个已经安装的包
helm test 测试模拟安装
helm template 渲染模版,可以看看各个值映射的对不对

编写示例:普罗米修斯容器化方案

prometheus+grafana,并实现以文件的方式自动发现
当然,这里只是简单演示,具体请按自己情况来添加其他需要的功能
deployment:

prometheus.yaml

#/bin/prometheus --config.file=/etc/prometheus/prometheus.yml --storage.tsdb.path=/prometheus --web.console.libraries=/usr/share/prometheus/console_libraries --web.console.templates=/usr/share/prometheus/consoles

apiVersion: apps/v1
kind: StatefulSet
metadata: 
  name: prometheus
  namespace: {{.Values.namespace}}
spec: 
  serviceName: prometheus
  replicas: {{.Values.prom.replicaCount}}
  selector: 
    matchLabels: 
      app: prometheus
  template: 
    metadata: 
      labels: 
        app: prometheus
    spec: 
      containers: 
      - name: prometheus
        image: prom/prometheus:latest
        imagePullPolicy: IfNotPresent
        args:
        - "--config.file=/etc/prometheus/conf/prometheus.yml"
        # user: root
        # command:  ["chmod", "-R", "777", "/prometheus"]
        volumeMounts: 
          - mountPath: /etc/prometheus/conf/
            name: prometheusconf
          - name: storage 
            mountPath: /prometheus
          - name: static-sd
            mountPath: /var/
      volumes: 
      - name: prometheusconf
        hostPath:
          path: /prom/conf/ #配置文件存放地址
      - name: storage
        hostPath: 
          path: /data01/ #node上的挂载点,记得权限放高点,不然pod里面的用户没有修改这个目录的权限就会导致失败
          type: DirectoryOrCreate
      - name: static-sd
        configMap:
          name: prometheus-file-sd #节点自动发现

grafana.yaml

apiVersion: apps/v1 
kind: Deployment
metadata: 
  name: grafana
  namespace: {{.Values.namespace}}
spec: 
  replicas: 1 
  selector: 
    matchLabels: 
      app: grafana
  template: 
    metadata: 
      labels: 
        app: grafana 
    spec:
      containers: 
      - name: grafana
        image: grafana/grafana:latest
        imagePullPolicy: IfNotPresent

configuremap:

file-sd.yaml

apiVersion: v1
kind: ConfigMap
metadata:
  name: prometheus-file-sd
  namespace: {{ .Values.namespace }}
  labels:
    app: promtest
data:
  file-sd.json: |
    [
    ]

service

prom-ser.yaml

kind: Service
apiVersion: v1
metadata:
  name: prometheus
  namespace: {{ .Values.namespace }}
  labels:
    app: prometheus
spec:
  type: NodePort
  ports:
  - name: http
    port: 9090
    protocol: TCP
    targetPort: 9090
    nodePort: 30001
  selector:
    app: prometheus

gra-ser.yaml

kind: Service
apiVersion: v1
metadata:
  name: grafana
  namespace: {{ .Values.namespace }}
  labels:
    app: grafana
spec:
  type: NodePort
  ports:
  - name: grafana
    port: 3000
    targetPort: 3000
    nodePort: 30002
  selector:
    app: grafana

values.yaml

namespace: promtest

prom: 
  replicaCount: 1
  image:
  - name: prometheus
    image: prometheus:latest
    pullPolicy: IfNotPresent