nginx
基础
nginx可作为http服务器,也可作为反向代理服务器\邮件服务器等,支持FastCGI、SSL、Virtual Host、URL Rewrite、Gzip等功能。并且支持很多第三方的模块扩展
概念
特点
- 支持高并发,消耗内存资源少
- web服务功能
- 负载均衡
- 正反向代理功能
- 网站缓存功能
- 多平台部署
- 通讯时采用异步网络IO模型:epoll模型
工作原理
nginx由内核和一系列模块组成,内核提供web服务的基本功能如启用网络协议、创建运行环境、接收分配客户端请求、处理模块交互等。而模块分为核心模块、基础模块、第三方模块
- 核心模块: HTTP模块、EVENT模块和MAIL模块
- 基础模块: HTTP Access模块、HTTP FastCGI模块、HTTP Proxy模块和HTTP Rewrite模块
- 第三方模块: HTTP Upstream Request Hash模块、Notice模块和HTTP Access Key模块及用户自己开发的模块
架构

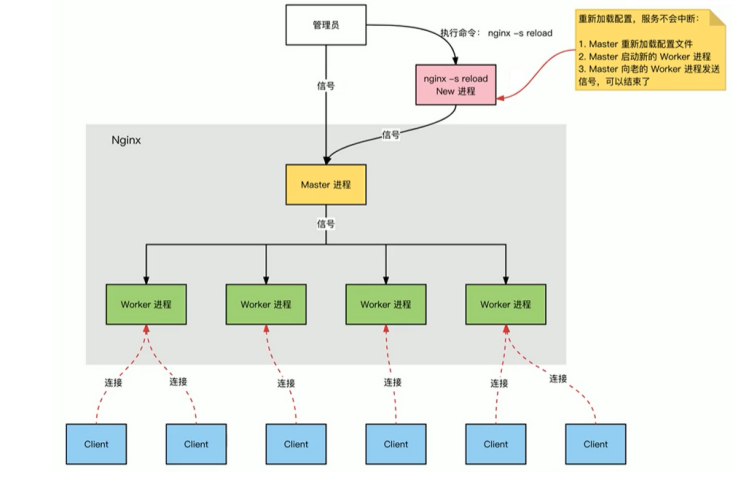
nginx有一个master进程和多个worker进程,master主要负责管理worker进程,worker主要负责处理网络请求
master:
- 接收外界信号
- 向worker发送信号
- 监控worker进程的状态
- 当worke进程异常退出,重启worker进程
- 读取配置文件并验证来保证其有效性和正确性
- 建立绑定关闭socket连接
- 不中断服务实现平滑升级,升级失败进行回滚
worker
- 多个worker同等竞争客户端的请求,互相间独立
- 一个请求只能在一个worker中处理
- worker的进程数可以设置,一般设置为核心数,充分利用CPU资源
- I/O调用、与后端服务器通信,获取数据
- 缓存数据
- 发送请求结果,响应用户请求
平滑升级
建立连接和请求处理
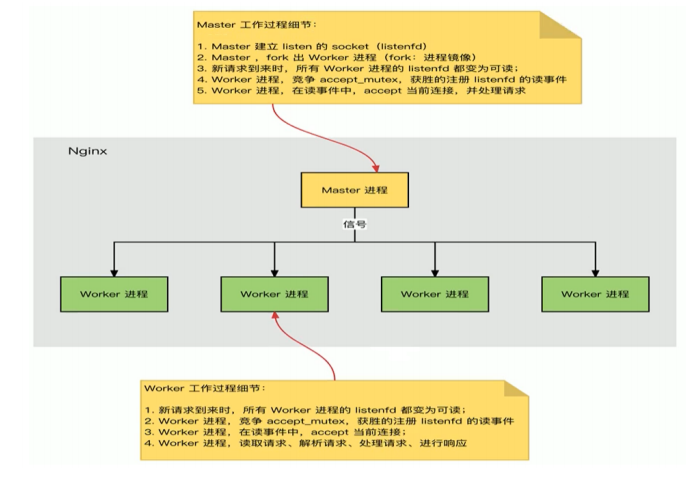
- nginx启动时,master加载配置文件
- master初始化监听的socket
- master fork出多个worker进程
- worker竞争连接,获胜者通过三次握手建立起socket连接处理请求

nginx采用多进程的方式处理事件,基于异步和非阻塞的事件驱动模型以达到高并发。多进程使得每个worker都是独立的进程,不需要加锁,节省了开销,并且进程之间互不影响
惊群效应指的是在多进程、多线程等待同一资源时,当某以资源可用,多个进\线程会被惊醒去竞争资源。惊群会导致大量的无效调度,上下文切换,给cpu带来极大 的压力,同时抢资源也会涉及到同步问题,需要对资源进行加锁保护,加锁会加大cpu的开销。nginx使用一把共享锁accept来保证同一时刻只有一个worker在accept连接以解决惊群问题。当一个worker进程accept这个连接后,就开始读取请求,解析请求,处理请求,产生数据后,再返回给客户端,最后才断开连接,这样一个完成的请求就结束了。
进程间通信:
主进程与工作进程:root启动主进程,master程用fork,在nginx服务器启动过程中根据配置文件决定启动的worker进程数量,然后建一张全局的工作表用于放当前所有未退出的工作进程。master生成worker进程后将新的worker加入到工作进程表中,并跟worker建立一个单向的管道用于发送指令传递信息等。master与外界通过信号机制进行通信,当遇到需要处理的信号时,通过这个单项管道跟worker发送指令,每当管道中有可读事件,worker都会从中读取解析,然后采取相应的执行动作。
工作进程之间:主进程在生成工作进程后,在工作进程中进行遍历,将新进程的id和管道句柄传递给其他进程,当A工作进程想给B工作进程发送指令时,现在主进程给他的信息中找到B的进程ID,然后将指令写入B的管道,B捕捉到管道内的事件后,解析并执行
目录
| 路径 | 类型 | 说明 |
|---|---|---|
| /etc/logrotate.conf | 配置文件 | 用于日志轮询切割 |
| /etc/nginx/ |
/etc/nginx/nginx.conf/
etc/nginx/conf.d/
/etc/nginx/nginx.conf.default|配置文件配置目录|nginx主配置文件|
|/etc/nginx/fastcgi_params
/etc/nginx/fastcgi_params.default
/etc/nginx/scgi_params
/etc/nginx/scgi_params.default
/etc/nginx/uwsgi_params
/etc/nginx/uwsgi_params.default|配置文件|cgi,fastcgi,uwcgi配置文件|
|/etc/nginx/koi-utf
/etc/nginx/koi-win|配置文件|nginx编码映射文件|
|/etc/nginx/mime.types
/etc/nginx/mime.types.default|配置文件|http协议的content-type与扩展
名|
|/usr/lib/systemd/system/nginx.service|配置文件|nginx服务守护进程管理文件|
|/etc/nginx/modules|目录信息|模块目录|
|/usr/sbin/nginx|命令信息|nginx模块管理|
配置文件
[root@server1 ~]# cat /etc/nginx/nginx.conf | grep -Ev "^#|^$"
user nginx; worker进程的管理用户
worker_processes auto;  worker进程数
error_log /var/log/nginx/error.log; 错误日志
pid /run/nginx.pid; pid文件
include /usr/share/nginx/modules/*.conf;
events {
    worker_connections 1024;  单个worker进程最大连接数
}
http {
    log_format  main  '$remote_addr - $remote_user [$time_local] "$request" '
                      '$status $body_bytes_sent "$http_referer" '
                      '"$http_user_agent" "$http_x_forwarded_for"';
                      日志格式
    access_log  /var/log/nginx/access.log  main; 日志文件
    sendfile            on; sendfile系统调用在两个文 件描述符之间直接传递数据(完全在内核中操作),从而避免了数据在内核缓冲区和用户缓冲区之间的拷贝,操作效率很高,被称之为零拷贝。
    tcp_nopush          on;在sendfile启动下,使用TCP_CORK套接字,当有数据时,确保数据包已经装满数据在发送, 避免了网络拥塞
    tcp_nodelay         on;连接保持活动状态
    keepalive_timeout   65; 超时时间
    types_hash_max_size 4096;影响散列表的冲突率
    include             /etc/nginx/mime.types;文件扩展名与文件类型映射表
    default_type        application/octet-stream;默认文件类型
    # Load modular configuration files from the /etc/nginx/conf.d directory.
    # See http://nginx.org/en/docs/ngx_core_module.html#include
    # for more information.
    include /etc/nginx/conf.d/*.conf;自定义配置文件
    server {
        listen       80; 监听的端口
        listen       [::]:80;
        server_name  _; 网站主机名
        root         /usr/share/nginx/html; 网站根目录
        # Load configuration files for the default server block.
        include /etc/nginx/default.d/*.conf;首页文件
        error_page 404 /404.html;定义错误页面
        location = /404.html {
        }
        error_page 500 502 503 504 /50x.html;
        location = /50x.html {
        }
    }
}
location匹配规则
~ 表示执行一个正则匹配,区分大小写;
~* 表示执行一个正则匹配,不区分大小写;
^~ 表示普通字符匹配。使用前缀匹配。如果匹配成功,则不再匹配其他location;
= 进行普通字符精确匹配。也就是完全匹配;
@ 它定义一个命名的 location,使用在内部定向时,例如 error_page, try_files
优先级:=/^/
,~*/常规字符串
location = /
{
        [ configuration A ]
}

location /
{
        [ configuration B ]
}

location /documents/
{
        [ configuration C ]
}

location ^~ /images/
{
        [ configuration D ]
}

location ~* \.(gif|jpg|jpeg)$
{
         [ configuration E ]
}

A:请求 /
B: 请求 index.html
C: 请求 /documents/document.html
D: 请求 /images/1.jpg
E: 请求 /documents/document.gif

nginx -t 查看配置文件是否有错误
部署
yum安装
yum install -y epel-release.noarch
yum install -y nginx

[root@server1 ~]# systemctl start nginx
[root@server1 ~]# systemctl status nginx
● nginx.service - The nginx HTTP and reverse proxy server
   Loaded: loaded (/usr/lib/systemd/system/nginx.service; disabled; vendor preset: disabled)
   Active: active (running) since 五 2022-01-21 10:27:27 CST; 1min 16s ago
  Process: 16793 ExecStart=/usr/sbin/nginx (code=exited, status=0/SUCCESS)
  Process: 16790 ExecStartPre=/usr/sbin/nginx -t (code=exited, status=0/SUCCESS)
  Process: 16788 ExecStartPre=/usr/bin/rm -f /run/nginx.pid (code=exited, status=0/SUCCESS)
 Main PID: 16795 (nginx)
   CGroup: /system.slice/nginx.service
           ├─16795 nginx: master process /usr/sbin/nginx
           ├─16796 nginx: worker process
           └─16797 nginx: worker process

1月 21 10:27:27 server1 systemd[1]: Starting The nginx HTTP and reverse proxy server...
1月 21 10:27:27 server1 nginx[16790]: nginx: the configuration file /etc/nginx/nginx... ok
1月 21 10:27:27 server1 nginx[16790]: nginx: configuration file /etc/nginx/nginx.con...ful
1月 21 10:27:27 server1 systemd[1]: Started The nginx HTTP and reverse proxy server.
Hint: Some lines were ellipsized, use -l to show in full.

[root@server1 ~]# nginx -v
nginx version: nginx/1.20.1


[root@server1 ~]# systemctl stop firewalld
[root@server1 ~]# setenforce 0
访问验证即可
编译安装
wget  地址 -P /usr/local/src
cd /usr/local/src
tar xzvf nginx-1.20.2.tar.gz
cd nginx-1.20.2/
yum install -y gcc pcre-devel openssl-devel zlib-devel
useradd -r -s /sbin/nologin nginx
./configure --prefix=/apps/nginx --user=nginx --group=nginx --with-http_ssl_module --with-http_v2_module --with-http_realip_module --with-http_stub_status_module --with-http_gzip_static_module --with-pcre --with-stream --with-stream_ssl_module --with-stream_realip_module
make -j 2 && make install
chown -R nginx.nginx /apps/nginx
ln -s /apps/nginx/sbin/nginx /usr/bin/
nginx -v
nginx
history
nginx -s stop#关闭搭建网站
vim /etc/nginx/conf.d/test1.conf
server{
        listen *:8888;
        server_name www.shangxizhuan.xyz;
        location  /
        {
                root /usr/share/nginx/test1;
                index index1.html;
        }
}
编写网站代码,chmod777给代码赋权(要注意根目录要放在别人有访问权限的目录下面),编写hosts做域名解析,重启(以下两种方式不要混用)
systemctl reload/restart nginx.service

另外一种重启方式,不可混用

nginx -s reload
搭建多个网站(FQDN)
[root@server1 conf.d]# cat *.conf
server{
        listen *:8080;
        server_name bbs.test.com;
        location / {
        root /html/bbs;
        index index.html;
}

}
server{
        listen *:8080;
        server_name blog.test.com;
        location / {
        root /html/blog;
        index index.html;
}
}


server {
        listen *:8080;
        server_name www.test.com;
        location / {
        root /html/blog;
        index index.html;
}
}

hosts,chmod赋权,重启
搭建多个网站(基于端口)
[root@server1 conf.d]# cat www.conf

server {
        listen  *:7777;
        server_name www.test.com;
        location /{
        root /usr/share/nginx/html;
        index index.html;
}
}

server {
        listen *:8888;
        server_name www.test.com;
        location / {
        root /html/blog;
        index index.html;
}
}

hosts,chmod,重启
常用模块
ngx_http_access_module基于ip访问控制
location / {
    deny  192.168.1.1;
    allow 192.168.1.0/24;
    allow 10.1.1.0/16;
    allow 2001:0db8::/32;
    deny  all;
}


location / {
        allow 192.168.226.1;
        deny all;# 只有192.168.226.1被放行,单独放行一定要卸载deny前面
}
ngx_http_auth_basic_module 基于用户认证
htpasswd -bc /etc/nginx/conf/htpasswd admin 123456

[root@server1 ~]# cat /etc/nginx/conf.d/test1.conf
server {
listen *:8888;
server_name www.xxx.com;
location / {
auth_basic "closed site";
auth_basic_user_file /etc/nginx/conf/htpasswd;
root /usr/share/nginx/test1/;
index index1.html;
}
}
htpasswd参数
-c:创建一个密码文件
-n:不会更新文件,显示文件内容信息
-b:免交互式输入用户密码信息
-i:读取密码采用标准输入方式,并不做检查
-m:使用md5的加密算法
-B:使用bcrypt对密码进行加密
-C:使用bcrypt algorithm对密码进行加密
-d:密码加密方式
-s:加密方式
-p:不进行加密
-D:删除指定用户
ngx_http_stub_status_module输出基本访问状态信息
location = /basic_status
{
        stub_status;
}
ngx_http_log_module
log_format compression '$remote_addr - $remote_user [$time_local] '
                       '"$request" $status $bytes_sent '
                       '"$http_referer" "$http_user_agent" "$gzip_ratio"';

access_log /spool/logs/nginx-access.log compression buffer=32k;

$remote_addr与$http_x_forwarded_for: 用以记录客户端的ip地址;
$remote_user:用来记录客户端用户名称;
$time_local:用来记录访问时间与时区;
$request:用来记录请求的url与http协议;
$status:用来记录请求状态;成功是200
$body_bytes_s ent:记录发送给客户端文件主体内容大小;
$http_referer:用来记录从那个页面链接访问过来的;
$http_user_agent:记录客户端浏览器的相关信息
ngx_http_ssl_module https
格式
etc/ngnix/nginx.conf
server {
    listen              443 ssl;
    server_name         example.com;

    ssl_certificate     example.com.rsa.crt;
    ssl_certificate_key example.com.rsa.key;

    ssl_certificate     example.com.ecdsa.crt; //ssl_certificate     $ssl_server_name.crt;
    ssl_certificate_key example.com.ecdsa.key; //ssl_certificate_key $ssl_server_name.key;

    ...
}
实例
openssl req -newkey rsa:4096 -nodes -sha256 -keyout ca.key -x509 -days 3650 -out ca.crt

openssl req -newkey rsa:4096 -nodes -sha256 -keyout iproute.cn.key -out iproute.cn.csr

openssl x509 -req -days 36500 -in iproute.cn.csr -CA ca.crt -CAkey ca.key -CAcreateserial -out iproute.cn.crt

cat iproute.cn.crt ca.crt > iproute.crt 12


openssl x509 -in iproute.cn.crt -noout -text

vim /etc/nginx/nginx.conf

        server{
        listen 80;
        listen 443 ssl;
        ssl_certificate /apps/nginx/certs/iproute.crt;
        ssl_certificate_key /apps/nginx/certs/iproute.cn.key;#这两行地址自行修改
        ssl_session_cache shared:sslcache:20m;
        ssl_session_timeout 10m;
        root         /usr/share/nginx/html;
        error_page 404 /404.html;
        location = /404.html {
        }

        error_page 500 502 503 504 /50x.html;
        location = /50x.html {
        }
注意因为是自己签的证书,所以可能被浏览器拦截,继续访问就行
代理与缓存
透明代理https://www.likecs.com/show-204728064.html
正向代理:
让内网访问外部资源
反向代理:
作用在服务器端,我们把请求发给反向代理服务器,由代理去选择目标服务器获取数据后再返回内网客户端。就是让外部访问内部资源,多用于负载均衡
正向代理
1. resolver:指定dns服务器地址
2. proxy_pass:代理到的地址
3. resolver_timeout:dns解析超时时长

方法一:
[root@server1 ~]#cat /etc/nginx/conf.d/test1.conf
server {
listen *:9999;
resolver 114.114.114.114;
location / {
        proxy_pass http://$http_host$request_uri;
}
}

[root@server2 ~]# curl -x 192.168.226.148:9999 www.baidu.com
<!DOCTYPE html>

方法二:客户机修改http_proxy参数
export http_proxy=http://192.168.80.10:8090

如果想要永久修改就把这个参数写在/etc/profile
反向代理
基于http的简单的反向代理
配置好一台被代理机器
ip为192.168.226.150
[root@server2 ~]# cat /etc/nginx/conf.d/server2.conf
server {
listen 8080;
location / {
root /usr/share/nginx/test1/;
index server2.html;
}
}
代理服务器的配置
[root@server1 ~]# cat /etc/nginx/conf.d/test2.conf
server {
listen *:7777;
location / {
proxy_pass http://192.168.226.150:8080;
}
}
访问代理服务器:7777,看到显示的页面是被代理服务器的页面,查看被代理服务器日志,看到的是代理服务器的访问ip
192.168.226.148 - - [06/Mar/2022:22:04:03 +0800] "GET /favicon.ico HTTP/1.0" 404 555 "http://192.168.226.148:7777/" "Mozilla/5.0 (Windows NT 10.0; Win64; x64) AppleWebKit/537.36 (KHTML, like Gecko) Chrome/99.0.4844.51 Safari/537.36" "-"
也可以把代理配置写成文件,需要调用的时候include
[root@server1 conf.d]# cat test2.conf
server {
listen *:7777;
location / {
proxy_pass http://192.168.226.150:8080;
include /etc/nginx/conf.d/proxy_params;
}
}

[root@server1 conf.d]# cat proxy_params
proxy_set_header Host $http_host;
proxy_set_header X-Real-IP $remote_addr;
proxy_set_header X-Forwarded-For $proxy_add_x_forwarded_for;
proxy_connect_timeout 30;
proxy_send_timeout 60;
proxy_read_timeout 60;
proxy_buffering on;
proxy_buffer_size 32k;
proxy_buffers 4 128k;
proxy_cache缓存:
[root@server1 conf.d]# cat /etc/nginx/nginx.conf

http {
proxy_cache_path /web_cache/web1 levels=1:2 max_size=20m inactive=5m loader_sleep=1m keys_zone=mycache:10m;
#缓存数据存放路径;二级路径,分别以1,2位16进制数来命名;最大缓存数据20M。如果超过5分钟没被访问强制刷新,加载周期间隔;定义共享内存区mycache
proxy_temp_path /web_cache/tmp;
#响应数据的临时存放目录


[root@server1 conf.d]# cat test2.conf
server {
listen *:7777;
location / {
proxy_pass http://192.168.226.150:8080;
proxy_cache mycache;#设置使用哪个缓存区,同一个缓存区可以被多处配置共享
proxy_cache_valid 200 301 1h;#状态码位200,301的响应缓存1h
proxy_cache_valid any 1m;#其他状态缓存1min
}
}
fastcgi
FastCGI是一个可伸缩地、高速地在HTTP服务器和动态脚本语言间通信的接口。nginx本身不支持对动态程序的直接调用和解析,如php等,如需做这些功能,则必须要调用fastcgi接口。为了调用CGI程序,还需要一个FastCGI的wrapper,这个wrapper绑定在某个固定socket上,如端口或者文件socket。当Nginx将CGI请求发送给这个socket的时候,通过FastCGI接口,wrapper接收到请求,然后派生出一个新的线程,这个线程调用解释器或者外部程序处理脚本并读取返回数据;接着,wrapper再将返回的数据通过FastCGI接口,沿着固定的socket传递给Nginx;最后,Nginx将返回的数据发送给客户端,这就是Nginx+FastCGI的整个运作过程。
动静分离是吧网站的静态资源和后台应用分开部署,提高用户访问静态代码的速度,降低对后台应用的访问。动静分离的一种做法是将静态资源部署在nginx上,后台项目部署到应用服务器上,根据一定规则静态资源的请求全部请求nginx服务器,达到动静分离的目标。
- 用户通过http协议发起请求,请求会先抵达LNMP架构中的nginx;
- nginx会根据用户的请求进行location规则匹配;
- location如果匹配到请求是静态,则由nginx读取本地直接返回;
- location如果匹配到请求是动态,则由nginx将请求转发给fastcgi协议;
- fastcgi收到请求交给php-fpm管理进程,php-fpm管理进程接收到后会调用具体的工作进程wrapper;
- wrapper进程会调用PHP程序进行解析,如果只是解析代码,php直接返回;
- 如果有查询数据库操作,则由php连接数据库(用户 密码 ip)发起查询的操作;
- 最终数据由mysql-->php-->php-fpm-->fastcgi-->nginx-->http-->user
nginx动静分离的好处
api接口服务化:动静分离之后,后端应用更为服务化,只需要通过提供api接口即可,可以为多个功能模块甚至是多个平台的功能使用,可以有效的节省后端人力,更便于功能维护。
前后端开发并行:前后端只需要关心接口协议即可,各自的开发相互不干扰,并行开发,并行自测,可以有效的提高开发时间,也可以有些的减少联调时间
减轻后端服务器压力,提高静态资源访问速度:后端不用再将模板渲染为html返回给用户端,且静态服务器可以采用更为专业的技术提高静态资源的访问速度。
实验
配置fastcgi,注意这里有个坑,不能用6666作为网站端口,会被浏览器拦下!!!
[root@server1 conf.d]# cat test3.conf
server {
        listen 8090;
        root /usr/share/nginx/dj;

        location / {
                index index.php index.html;
}
        location ~ \.php$ {#实现动静分离
                fastcgi_pass 127.0.0.1:9000;
                fastcgi_param SCRIPT_FILENAME $document_root$fastcgi_script_name;
                include fastcgi_params;
}

}
官网模板
server {
        location / {
                fastcgi_pass localhost:9000;
                fastcgi_param SCRIPT_FILENAME $document_root$fastcgi_script_name;
                fastcgi_param QUERY_STRING $query_string;
                }
        location ~ \.(gif|jpg|png)$ {
                root /data/images;
                }
        }
安装php,修改配置文件是的与nginx运行用户一致,使其开机自启
# 安装webtstic软件仓库 rpm -Uvh https://mirror.webtatic.com/yum/el7/webtatic-release.rpm # 安装php环境,php所需的组件比较多,我们可以一次性安装全面了 yum -y install php71w php71w-cli php71w-common php71w-devel php71w-embedded php71w-gd php71w-mcrypt php71w-mbstring php71w-pdo php71w-xml php71w-fpm php71w-mysqlnd php71w-opcache php71w-pecl-memcached php71w-pecl-redis php71w- pecl-mongodb


[root@server1 conf.d]# vim /etc/php-fpm.d/www.conf

; Start a new pool named 'www'.
[www]

; Unix user/group of processes
; Note: The user is mandatory. If the group is not set, the default user's group
;       will be used.
; RPM: apache Choosed to be able to access some dir as httpd
user = nginx
; RPM: Keep a group allowed to write in log dir.
group = nginx


[root@server1 conf.d]# systemctl start php-fpm.service
[root@server1 conf.d]# systemctl enable php-fpm.service
Created symlink from /etc/systemd/system/multi-user.target.wants/php-fpm.service to /usr/lib/systemd/system/php-fpm.service.


[root@server1 conf.d]# ss -tnl
State       Recv-Q Send-Q Local Address:Port               Peer Address:Port
LISTEN      0      128     127.0.0.1:9000                        *:*   #php默认端口
LISTEN      0      128             *:9999                        *:*
LISTEN      0      128             *:80                          *:*
LISTEN      0      128             *:22                          *:*
LISTEN      0      128             *:8888                        *:*
LISTEN      0      100     127.0.0.1:25                          *:*
LISTEN      0      128             *:7777                        *:*
LISTEN      0      128            :::80                         :::*
LISTEN      0      128            :::22                         :::*
LISTEN      0      100           ::1:25                         :::*
写了个phpinfo,访问正常,安装数据库,再写个访问数据库的测试代码
[root@server1 conf.d]# cat /usr/share/nginx/dj/mysql.php
<?php
        $servername = "localhost";
        $username ="root";
        $password ="123456";

        $conn = mysqli_connect($servername,$username,$password);

        if(!$conn){
        die(mysqli_connect_error());

}
        echo "连接成功";
?>
都ok,说明配置成功
nginx调优
再次把配置文件拿下来,在这个上面nginx可以做很多调优
[root@server1 ~]# cat /etc/nginx/nginx.conf | grep -Ev "^#|^$"
user nginx; worker进程的管理用户
worker_processes auto;  worker进程数
error_log /var/log/nginx/error.log; 错误日志
pid /run/nginx.pid; pid文件
include /usr/share/nginx/modules/*.conf;
events {
    worker_connections 1024;  单个worker进程最大连接数
}
http {
    log_format  main  '$remote_addr - $remote_user [$time_local] "$request" '
                      '$status $body_bytes_sent "$http_referer" '
                      '"$http_user_agent" "$http_x_forwarded_for"';
                      日志格式
    access_log  /var/log/nginx/access.log  main; 日志文件
    sendfile            on; sendfile系统调用在两个文件描述符之间直接传递数据(完全在内核中操作),从而避免了数据在内核缓冲区和用户缓冲区之间的拷贝,操作效率很高,被称之为零拷贝。
    tcp_nopush          on;在sendfile启动下,使用TCP_CORK套接字,当有数据时,确保数据包已经装满数据在发送, 避免了网络拥塞
    tcp_nodelay         on;连接保持活动状态
    keepalive_timeout   65; 超时时间
    types_hash_max_size 4096;影响散列表的冲突率
    include             /etc/nginx/mime.types;文件扩展名与文件类型映射表
    default_type        application/octet-stream;默认文件类型
    # Load modular configuration files from the /etc/nginx/conf.d directory.
    # See http://nginx.org/en/docs/ngx_core_module.html#include
    # for more information.
    include /etc/nginx/conf.d/*.conf;自定义配置文件
    server {
        listen       80; 监听的端口
        listen       [::]:80;
        server_name  _; 网站主机名
        root         /usr/share/nginx/html; 网站根目录
        # Load configuration files for the default server block.
        include /etc/nginx/default.d/*.conf;首页文件
        error_page 404 /404.html;定义错误页面
        location = /404.html {
        }
        error_page 500 502 503 504 /50x.html;
        location = /50x.html {
        }
    }
}
- nginx工作进程数一般设置为cpu核心数或者核心数*2,top按1可以看到核心数
worker_processes auto; worker进程数- nginx时间处理模型,采用epoll处理效率高,work_connections指单个worker进程允许客户端最大连接数,multi_accept 告诉nginx收到一个新连接通知后接受尽可能多的的链接,设为on后,一次链接只有一个worker被唤醒,off时,一个链接会唤醒所有worker
events {
  use epoll;
  worker_connections 65535;
  multi_accept on;
}- sendfile高效传输
sendfile            on; sendfile系统调用在两个文件描述符之间直接传递数据(完全在内核中操作),从而避免了数据在内核缓冲区和用户缓冲区之间的拷贝,操作效率很高,被称之为零拷贝。
tcp_nopush on;在sendfile启动下,使用TCP_CORK套接字,当有数据时,确保数据包已经装满数据在发送, 避免了网络拥塞- gzip调优,gzip会根据我们的设置来压缩一些内容,节省带宽,加快传输速度,但是会对cpu造成消耗
gzip on;
gzip_min_length 2k;
gzip_buffers   4 32k;
gzip_http_version 1.1;
gzip_comp_level 6;
gzip_typestext/plain text/css text/javascriptapplication/json application/javascript application/x-javascriptapplication/xml;
gzip_vary on;
gzip_proxied any;
gzip on;   #开启压缩功能

gzip_min_length 1k :设置允许压缩的页面最小字节数,页面字节数从header头的Content-Length中获取,默认值是0,不管页面多大都进行压缩,建议设置成大于1K,如果小与1K可能会越压越大。

gzip_buffers 4 32k :压缩缓冲区大小,表示申请4个单位为32K的内存作为压缩结果流缓存,默认值是申请与原始数据大小相同的内存空间来存储gzip压缩结果。

gzip_http_version 1.1 :压缩版本,用于设置识别HTTP协议版本,默认是1.1,目前大部分浏览器已经支持GZIP解压,使用默认即可。

gzip_comp_level 6 :压缩比例,用来指定GZIP压缩比,1压缩比最小,处理速度最快,9压缩比最大,传输速度快,但是处理慢,也比较消耗CPU资源。

gzip_types text/css text/xml application/javascript :用来指定压缩的类型,‘text/html’类型总是会被压缩。默认值: gzip_types text/html (默认不对js/css文件进行压缩)

压缩类型,匹配MIME型进行压缩;

不能用通配符 text/*;

text/html默认已经压缩 (无论是否指定);

设置哪压缩种文本文件可参考 conf/mime.types。

gzip_vary on :varyheader支持,改选项可以让前端的缓存服务器缓存经过GZIP压缩的页面,例如用Squid缓存经过nginx压缩的数据。- 防盗链
location ~*^.+\.(jpg|gif|png|swf|flv|wma|wmv|asf|mp3|mmf|zip|rar)$ {
valid_referers noneblocked www.benet.com benet.com;
if($invalid_referer) {
  #return 302 http://www.benet.com/img/nolink.jpg;
  return 404;
  break;
}
access_log off;
}
缓存proxy_cache / fastcgi_cache
fastcgi_cache_path/usr/local/nginx1.10/fastcgi_cache levels=1:2 keys_zone=cache_fastcgi:128minactive=1d max_size=10g;

fastcgi_cache_path /usr/local/nginx1.10/fastcgi_cachelevels=1:2 keys_zone=cache_fastcgi:128minactive=1d max_size=10g :fastcgi_cache缓存目录,可以设置目录层级,比如1:2会生成16*256个子目录,cache_fastcgi是这个缓存空间的名字,cache是用多少内存(这样热门的内容nginx直接放内存,提高访问速度),inactive表示默认失效时间,如果缓存数据在失效时间内没有被访问,将被删除,max_size表示最多用多少硬盘空间。

fastcgi_cache cache_fastcgi :#表示开启FastCGI缓存并为其指定一个名称。开启缓存非常有用,可以有效降低CPU的负载,并且防止502的错误放生。cache_fastcgi为proxy_cache_path指令创建的缓存区名称。

fastcgi_cache_valid 200 302 1h :#用来指定应答代码的缓存时间,实例中的值表示将200和302应答缓存一小时,要和fastcgi_cache配合使用。

fastcgi_cache_valid 301 1d :将301应答缓存一天。

fastcgi_cache_valid any 1m :将其他应答缓存为1分钟。

fastcgi_cache_min_uses 1 :该指令用于设置经过多少次请求的相同URL将被缓存。

fastcgi_cache_key http://$host$request_uri :该指令用来设置web缓存的Key值,nginx根据Key值md5哈希存储.一般根据$host(域名)、$request_uri(请求的路径)等变量组合成proxy_cache_key 。

fastcgi_pass  :指定FastCGI服务器监听端口与地址,可以是本机或者其它。

proxy_cache的作用是缓存后端服务器的内容,可能是任何内容,包括静态的和动态。
评论已关闭