k8s部署示例
deployment
以之前写的一个go微服务镜像为例子
https://k8s.easydoc.net/docs/dRiQjyTY/28366845/6GiNOzyZ/3iQiyInr
https://blog.csdn.net/m0_54024707/article/details/122225607 可作为参考,或者运行kubectl explain pod
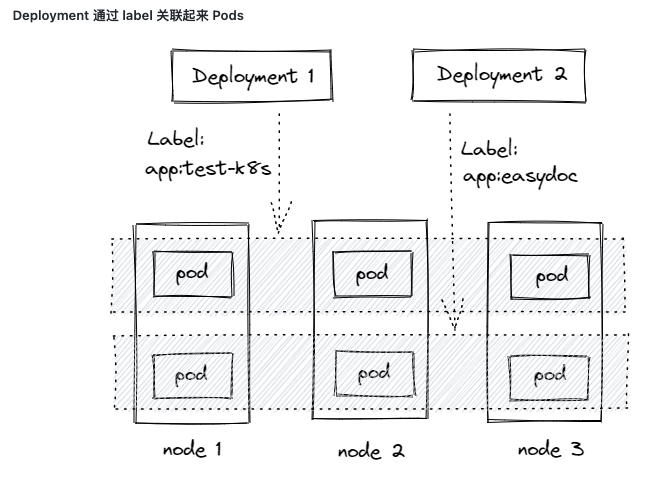
这里不知为啥直接拉镜像拉不下来,于是我把镜像在每个node上都拉了一份
apiVersion: apps/v1 #kubectl api-versions
kind: Deployment
metadata:
name: go-microserver #部署的服务的名字
spec: #详细定义
replicas: 2 #副本数
#使用标签来查找关联的pod
selector:
  matchLabels:
    app: go-server-test
#创建pod使用的模版
template:
  metadata:
    labels:
      app: go-server-test #这里必须和上面标签选择器相同,不然会找不到
  # 定义容器
  spec:
    containers:
    - name: "go-service"
      image: registry-vpc.cn-hangzhou.aliyuncs.com/tokugawa/micro-go
      ports:
      - name: httpd  #名称
        containerPort: 8080 #容器内部服务真正的端口,targetport映射在这个端口上
        protocol: TCP
        # port: 8081 # 集群内部访问pod
        # nodePort: 8082 #集群外部客户端访问pod
        # targetPort: 8080 #pod的端口,从port和nodePort来的流量经过kube-proxy流入到后端pod的targetPort上,最后进入容器
[root@master ~]# kubectl get pods -o wide NAME READY STATUS RESTARTS AGE IP NODE NOMINATED NODE READINESS GATES go-microserver-8b87c8767-59t8t 1/1 Running 0 43s 10.244.0.16 node1 <none> <none> go-microserver-8b87c8767-9pxkf 1/1 Running 0 43s 10.244.0.16 node2 <none> <none> [root@master ~]# kubectl describe pod go-microserver-8b87c8767-kbk9n Name: go-microserver-8b87c8767-kbk9n Namespace: default Priority: 0 Node: node1/172.29.36.123 Start Time: Tue, 30 Aug 2022 15:00:55 +0800 Labels: app=go-server-test pod-template-hash=8b87c8767 Annotations: <none> Status: Running IP: 10.244.0.14 IPs: IP: 10.244.0.14 Controlled By: ReplicaSet/go-microserver-8b87c8767 Containers: go-service: Container ID: docker://7dc5da32e70e0e2453b9cbe36a13ed6947d35884a093df554ad4ddb0b617a607 Image: registry.cn-hangzhou.aliyuncs.com/tokugawa/micro-go:v1 Image ID: docker-pullable://registry.cn-hangzhou.aliyuncs.com/tokugawa/micro-go@sha256:04fbd8859168bf7e3321e1fcb574bc5b6d41f8c2915094e268cf45abb77f2515 Port: 8080/TCP Host Port: 0/TCP State: Running Started: Tue, 30 Aug 2022 15:00:57 +0800 Ready: True Restart Count: 0 Environment: <none> Mounts: /var/run/secrets/kubernetes.io/serviceaccount from kube-api-access-qnk7x (ro) Conditions: Type Status Initialized True Ready True ContainersReady True PodScheduled True Volumes: kube-api-access-qnk7x: Type: Projected (a volume that contains injected data from multiple sources) TokenExpirationSeconds: 3607 ConfigMapName: kube-root-ca.crt ConfigMapOptional: <nil> DownwardAPI: true QoS Class: BestEffort Node-Selectors: <none> Tolerations: node.kubernetes.io/not-ready:NoExecute op=Exists for 300s node.kubernetes.io/unreachable:NoExecute op=Exists for 300s Events: Type Reason Age From Message ---- ------ ---- ---- ------- Normal Scheduled 100s default-scheduler Successfully assigned default/go-microserver-8b87c8767-kbk9n to node1 Normal Pulled 98s kubelet Container image "registry.cn-hangzhou.aliyuncs.com/tokugawa/micro-go:v1" already present on machine Normal Created 98s kubelet Created container go-service Normal Started 98s kubelet Started container go-service进入pod内部
kubectl  exec -ti podname -- /bin/sh

# pwd
/go/src/mircoservice-1
# ps -ef | grep example
root         1     0  0 07:13 ?        00:00:00 /bin/sh -c ${SOURCES}example
root         7     1  0 07:13 ?        00:00:00 /go/src/mircoservice-1/example
root        18    11  0 07:16 pts/0    00:00:00 grep example
# curl 127.0.0.1:8080
<h1>hello!</h1></br>
<h2>here is the main website!</h2>
<b>enjoy your day!</b></br>
扩容
kubectl scale deployment go-microserver  --replicas=3
deployment.apps/go-microserver scaled

[root@master ~]# kubectl get pods
NAME                              READY   STATUS    RESTARTS   AGE
go-microserver-7d47df97fd-d25wg   1/1     Running   0          27m
go-microserver-7d47df97fd-gmzj2   0/1     Pending   0          40s
go-microserver-7d47df97fd-s849v   1/1     Running   0          27m
使用指令端口映射,但是只对本地localhost网卡有效
kubectl port-forward go-microserver-8b87c8767-6j77l 8080:8080

[root@master ~]# curl localhost:8080
<h1>hello!</h1></br>
<h2>here is the main website!</h2>
<b>enjoy your day!</b></br>
查看日志
[root@master ~]# kubectl logs pod/go-microserver-8b87c8767-6j77l
[GIN-debug] [WARNING] Creating an Engine instance with the Logger and Recovery middleware already attached.

[GIN-debug] [WARNING] Running in "debug" mode. Switch to "release" mode in production.
 - using env:   export GIN_MODE=release
 - using code:  gin.SetMode(gin.ReleaseMode)

[GIN-debug] GET    /ping                     --> main.main.func1 (3 handlers)
[GIN-debug] GET    /hello                    --> main.main.func2 (3 handlers)
[GIN-debug] Loaded HTML Templates (2):
      -
      - index.html

[GIN-debug] GET    /ico                      --> github.com/gin-gonic/gin.(*RouterGroup).StaticFile.func1 (3 handlers)
[GIN-debug] HEAD   /ico                      --> github.com/gin-gonic/gin.(*RouterGroup).StaticFile.func1 (3 handlers)
[GIN-debug] GET    /                         --> main.main.func3 (3 handlers)
[GIN-debug] GET    /api/books                --> main.main.func4 (3 handlers)
[GIN-debug] GET    /api/books/:isbn          --> main.main.func5 (3 handlers)
[GIN-debug] PUT    /api/books/:isbn          --> main.main.func6 (3 handlers)
[GIN-debug] POST   /api/books                --> main.main.func7 (3 handlers)
[GIN-debug] DELETE /api/books/:isbn          --> main.main.func8 (3 handlers)
[GIN-debug] [WARNING] You trusted all proxies, this is NOT safe. We recommend you to set a value.
Please check https://pkg.go.dev/github.com/gin-gonic/gin#readme-don-t-trust-all-proxies for details.
[GIN-debug] Listening and serving HTTP on :8080
[GIN] 2022/08/30 - 08:04:14 | 200 |     267.116µs |       127.0.0.1 | GET      "/"
查看历史版本
kubectl rollout history deployment go-microserver
service
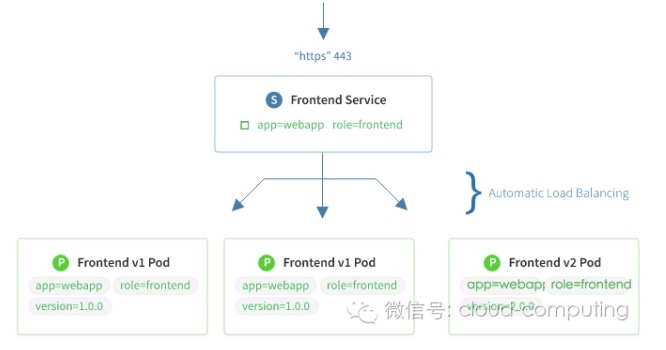
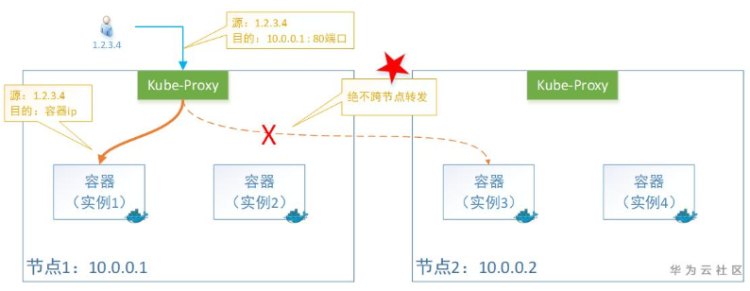
上面起的实例如果想要访问里面的服务还得单独做端口映射,并且只在本机有效,也没办法做到负载均衡,很麻烦,如果我们想要在外部也能够访问到pod里面的服务,并且实现流量转发负载均衡等功能的话,我们可以使用service
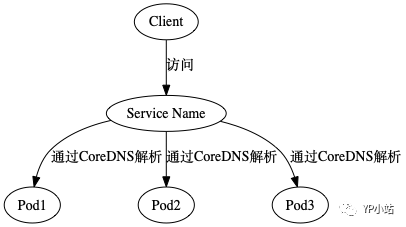
service通过标签对应pod,生命周期不与pod绑定,提供负载均衡作用,对外提供访问的端口,对内使用名字可以直接访问,其他具体看前一篇博客
NodePort
apiVersion: v1
kind: Service
metadata:
  name: go-service
spec: #详细定义
  selector:
    app: go-server-test
  type: NodePort
  ports:
    - port: 8080  #可以配置多端口
      targetPort: 8080 # 容器端口
      nodePort: 31111 #节点端口
部署后查看
[root@master ~]# kubectl get svc
NAME         TYPE        CLUSTER-IP      EXTERNAL-IP   PORT(S)          AGE
go-service   NodePort    10.101.79.120   <none>        8080:31111/TCP   5m34s
kubernetes   ClusterIP   10.96.0.1       <none>        443/TCP          17h
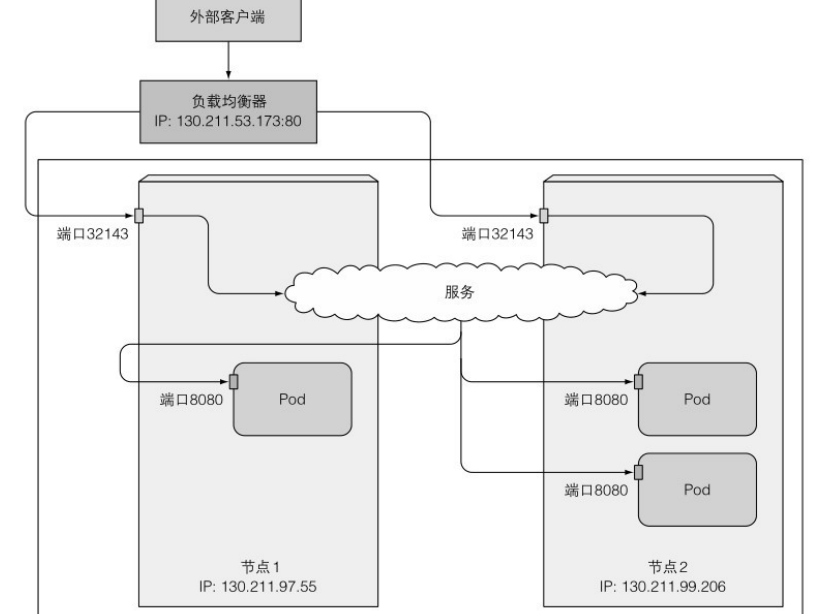
从另外一个节点用vip 8080访问,如果是外部机器访问则走31111,如果是云服务器,这里要记得放行端口
[root@node1 ~]# curl 10.101.79.120:8080
<h1>hello!</h1></br>
<h2>here is the main website!</h2>
statefulset
statefulset用于管理有状态的pod,例如数据库一类。pod的创建是顺序的,销毁是逆序的,如果被销毁重建,pod的名字不会改变,但是ip会变,所以使用名字而不要使用ip去连接。如果使用service名字去连接会随机连接上一个,要指定pod的话得用pod-name.service-name
这里以mysql(mariadb)官网镜像为例子
apiVersion: apps/v1
kind: StatefulSet
metadata:
  name: mariadb
spec:
  serviceName: mariadb
  replicas: 3
  selector:
    matchLabels:
      app: mariadb
  template:
    metadata:
      labels:
        app: mariadb
    spec:
      containers:
      - name: mariadb
        image: mariadb:latest
        imagePullPolicy: IfNotPresent #只有当本地不存在镜像才从远处拉取
        env:
        - name: MARIADB_ROOT_PASSWORD
          value: "123456"  #设置环境变量,这里必须至少得从三个里面选一个初始化:MARIADB_ROOT_PASSWORD, MARIADB_ALLOW_EMPTY_ROOT_PASSWORD and MARIADB_RANDOM_ROOT_PASSWORD

---

apiVersion: v1
kind: Service
metadata:
  name: mariadb
spec:
  selector:
    app: mariadb
  type: ClusterIP #默认类型,自动分配一个仅 cluster (集群)内部可以访问的虚拟 IP
  clusterIP: None #headless
  ports:
  - port: 3306
    targetPort: 3306
statefulset名字不再是随机的,这里因为做了个headless,所以clusterip没有ip
kubectl get pods -o wide
NAME                             READY   STATUS    RESTARTS   AGE   IP            NODE    NOMINATED NODE   READINESS GATES
go-microserver-74c85dd7f-8kzlh   1/1     Running   0          28h   10.244.0.21   node2   <none>           <none>
go-microserver-74c85dd7f-jlt4h   1/1     Running   0          28h   10.244.0.20   node1   <none>           <none>
go-microserver-74c85dd7f-m6wzl   1/1     Running   0          28h   10.244.0.20   node2   <none>           <none>
go-microserver-74c85dd7f-zntnr   1/1     Running   0          28h   10.244.0.21   node1   <none>           <none>
mariadb-0                        1/1     Running   0          17m   10.244.0.23   node1   <none>           <none>
mariadb-1                        1/1     Running   0          17m   10.244.0.23   node2   <none>           <none>
mariadb-2                        1/1     Running   0          17m   10.244.0.24   node1   <none>           <none>

[root@master ~]# kubectl get statefulset
NAME      READY   AGE
mariadb   3/3     7m23s

[root@master ~]# kubectl get svc
NAME         TYPE        CLUSTER-IP      EXTERNAL-IP   PORT(S)          AGE
go-service   NodePort    10.101.79.120   <none>        8080:31111/TCP   28h
kubernetes   ClusterIP   10.96.0.1       <none>        443/TCP          45h
mariadb      ClusterIP   None            <none>        3306/TCP         8m15s

[root@master ~]# kubectl get endpoints
NAME         ENDPOINTS                                                        AGE
go-service   10.244.0.20:8080,10.244.0.20:8080,10.244.0.21:8080 + 1 more...   28h
kubernetes   172.20.245.132:6443                                              45h
mariadb      10.244.0.23:3306,10.244.0.23:3306,10.244.0.24:3306               21m
这里登进去功能正常,但是连不通,换了nodeport用另外一台机器试一下连接发现被拒绝了,突然想起mariadb可能是初始化设置默认拒绝远程连接.....这里就不做演示了,多个副本可以配个主从,弄了端口映射后访问其中一个就行
数据持久化
statefulset的pod重建后里面的内容会丢失,如果想要数据持久化,我们可以挂载个盘上去,可以是本地磁盘,也可以是云厂商提供的相关服务,或者NFS之类的
如果是挂载在本地的目录,得要指定pod在那台机子上运行才行,这里以本地挂载的一种方式为例子
hostpath:使用本地目录
mariadb默认存储路径/var/lib/mysql/
apiVersion: apps/v1
kind: StatefulSet
metadata:
  name: mariadb
spec:
  serviceName: mariadb
  replicas: 1
  selector:
    matchLabels:
      app: mariadb
  template:
    metadata:
      labels:
        app: mariadb
    spec:
      containers:
      - name: mariadb
        image: mariadb:latest
        imagePullPolicy: IfNotPresent #只有当本地不存在镜像才从远处拉取
        env:
        - name: MARIADB_ROOT_PASSWORD
          value: "123456"
        volumeMounts:
          - mountPath: /var/lib/mysql/ #容器里面的挂载路径
            name: mysqldata #卷的名字,必须和下面一样
      volumes:
      - name: mysqldata
        hostPath:
          path: /data01/mysql #node上的挂载点
          type: DirectoryOrCreate     # 指向一个目录,不存在时自动创建
创建完去node1上查看,发现已经有文件了
[root@node1 ~]# ll /data01/mysql/
total 123328
-rw-rw---- 1 polkitd input    417792 Aug 31 22:55 aria_log.00000001
-rw-rw---- 1 polkitd input        52 Aug 31 22:55 aria_log_control
-rw-rw---- 1 polkitd input         9 Aug 31 22:55 ddl_recovery.log
-rw-rw---- 1 polkitd input       946 Aug 31 22:55 ib_buffer_pool
-rw-rw---- 1 polkitd input  12582912 Aug 31 22:55 ibdata1
-rw-rw---- 1 polkitd input 100663296 Aug 31 22:55 ib_logfile0
-rw-rw---- 1 polkitd input  12582912 Aug 31 22:55 ibtmp1
-rw-rw---- 1 polkitd input         0 Aug 31 22:55 multi-master.info
drwx------ 2 polkitd input      4096 Aug 31 22:55 mysql
drwx------ 2 polkitd input      4096 Aug 31 22:55 performance_schema
drwx------ 2 polkitd input     12288 Aug 31 22:55 sys
进pod创建个库表,塞点数据,发现node出现了对应的新文件
[root@master ~]# kubectl exec -it mariadb-0 -- /bin/bash
root@mariadb-0:/# mysql -uroot -p123456
Welcome to the MariaDB monitor.  Commands end with ; or \g.
Your MariaDB connection id is 3
Server version: 10.6.5-MariaDB-1:10.6.5+maria~focal mariadb.org binary distribution

Copyright (c) 2000, 2018, Oracle, MariaDB Corporation Ab and others.

Type 'help;' or '\h' for help. Type '\c' to clear the current input statement.

MariaDB [(none)]> create database db1 charset utf8;
Query OK, 1 row affected (0.000 sec)

MariaDB [(none)]> use db1
Database changed
MariaDB [db1]> create table tb1(name char(10),age int(3));
Query OK, 0 rows affected (0.007 sec)

MariaDB [db1]> insert into tb1 values("zhangsan",14),("lisi",15);
Query OK, 2 rows affected (0.001 sec)
Records: 2  Duplicates: 0  Warnings: 0

MariaDB [db1]> select * from tb1;
+----------+------+
| name     | age  |
+----------+------+
| zhangsan |   14 |
| lisi     |   15 |
+----------+------+
2 rows in set (0.000 sec)


[root@node1 ~]# ll /data01/mysql/
total 123340
-rw-rw---- 1 polkitd input    417792 Aug 31 22:55 aria_log.00000001
-rw-rw---- 1 polkitd input        52 Aug 31 22:55 aria_log_control
drwx------ 2 polkitd input      4096 Aug 31 23:11 db1
-rw-rw---- 1 polkitd input     12288 Aug 31 23:11 ddl_recovery.log
-rw-rw---- 1 polkitd input       946 Aug 31 22:55 ib_buffer_pool
-rw-rw---- 1 polkitd input  12582912 Aug 31 22:55 ibdata1
-rw-rw---- 1 polkitd input 100663296 Aug 31 23:12 ib_logfile0
-rw-rw---- 1 polkitd input  12582912 Aug 31 22:55 ibtmp1
-rw-rw---- 1 polkitd input         0 Aug 31 22:55 multi-master.info
drwx------ 2 polkitd input      4096 Aug 31 22:55 mysql
drwx------ 2 polkitd input      4096 Aug 31 22:55 performance_schema
drwx------ 2 polkitd input     12288 Aug 31 22:55 sys
现在我们把这个pod删掉,然后再次创建,发现数据还在
[root@master ~]# kubectl delete -f mysql.yaml
statefulset.apps "mariadb" deleted
[root@master ~]# kubectl get pod
NAME                             READY   STATUS    RESTARTS   AGE
go-microserver-74c85dd7f-8kzlh   1/1     Running   0          30h
go-microserver-74c85dd7f-jlt4h   1/1     Running   0          30h
go-microserver-74c85dd7f-m6wzl   1/1     Running   0          30h
go-microserver-74c85dd7f-zntnr   1/1     Running   0          30h
[root@master ~]# kubectl apply -f mysql.yaml
statefulset.apps/mariadb created
[root@master ~]# kubectl get pod
NAME                             READY   STATUS    RESTARTS   AGE
go-microserver-74c85dd7f-8kzlh   1/1     Running   0          30h
go-microserver-74c85dd7f-jlt4h   1/1     Running   0          30h
go-microserver-74c85dd7f-m6wzl   1/1     Running   0          30h
go-microserver-74c85dd7f-zntnr   1/1     Running   0          30h
mariadb-0                        1/1     Running   0          3s


[root@master ~]# kubectl exec -it mariadb-0 -- /bin/bash
root@mariadb-0:/# mysql -uroot -p123456
Welcome to the MariaDB monitor.  Commands end with ; or \g.
Your MariaDB connection id is 3
Server version: 10.6.5-MariaDB-1:10.6.5+maria~focal mariadb.org binary distribution

Copyright (c) 2000, 2018, Oracle, MariaDB Corporation Ab and others.

Type 'help;' or '\h' for help. Type '\c' to clear the current input statement.

MariaDB [(none)]> show databases;
+--------------------+
| Database           |
+--------------------+
| db1                |
| information_schema |
| mysql              |
| performance_schema |
| sys                |
+--------------------+
5 rows in set (0.000 sec)

MariaDB [(none)]> use db1;
Reading table information for completion of table and column names
You can turn off this feature to get a quicker startup with -A

Database changed
MariaDB [db1]> show tables;
+---------------+
| Tables_in_db1 |
+---------------+
| tb1           |
+---------------+
1 row in set (0.000 sec)

MariaDB [db1]> select * from tb1;
+----------+------+
| name     | age  |
+----------+------+
| zhangsan |   14 |
| lisi     |   15 |
+----------+------+
2 rows in set (0.000 sec)
pvc
Persistent Volume,也就是持久化存储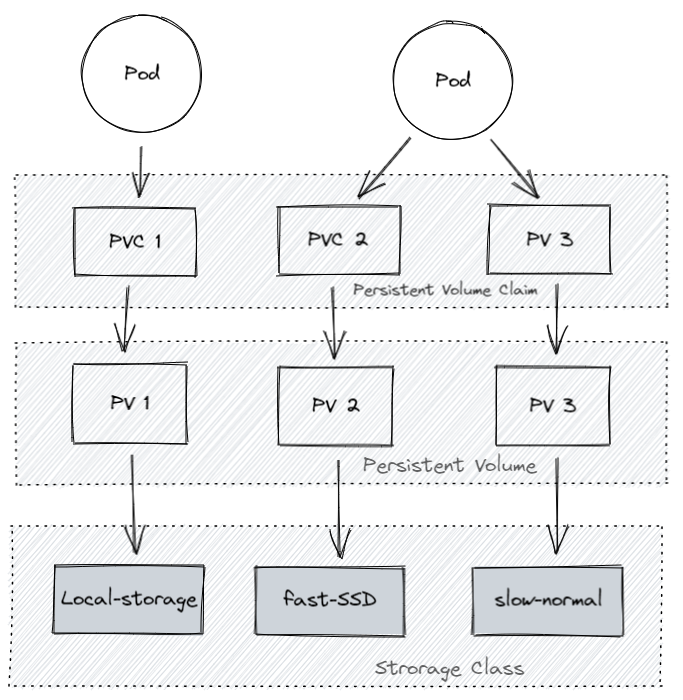
以一个本地pvc为例子,注意,这里需要提前创建挂载点目录!
apiVersion: apps/v1
kind: StatefulSet
metadata:
  name: mariadb
spec:
  serviceName: mariadb
  replicas: 1
  selector:
    matchLabels:
      app: mariadb
  template:
    metadata:
      labels:
        app: mariadb
    spec:
      containers:
      - name: mariadb
        image: mariadb:latest
        imagePullPolicy: IfNotPresent #只有当本地不存在镜像才从远处拉取
        env:
        - name: MARIADB_ROOT_PASSWORD
          value: "123456"
        volumeMounts:
          - mountPath: /var/lib/mysql/ #容器里面的挂载路径
            name: mysqldata #卷的名字,必须和下面一样
      volumes:
      - name: mysqldata
        persistentVolumeClaim:
         claimName: mariadbdata
---
apiVersion: storage.k8s.io/v1 # SC,划分存储盘的类型
kind: StorageClass
metadata:
  name: local-storage
provisioner: kubernetes.io/no-provisioner
volumeBindingMode: WaitForFirstConsumer
---
apiVersion: v1
kind: PersistentVolume ## 卷的具体描述信息
metadata:
  name: mariadbdata
spec:
  capacity:
    storage: 2Gi
  volumeMode: Filesystem  # Filesystem(文件系统) Block(块)
  accessModes:
    - ReadWriteOnce       # 卷可以被一个节点以读写方式挂载
  persistentVolumeReclaimPolicy: Delete #pv回收策略,怕误删可以选择Retain
  storageClassName: local-storage
  local:
    path: /data/sql
  nodeAffinity:
    required:
      # 通过 hostname 限定在某个节点创建存储卷
      nodeSelectorTerms:
        - matchExpressions:
            - key: kubernetes.io/hostname
              operator: In
              values:
                - node2
---
apiVersion: v1
kind: PersistentVolumeClaim #对存储需求的申请,系统根据这个申请单去寻找合适的pv
metadata:
  name: mariadbdata
spec:
  accessModes: ["ReadWriteOnce"]
  storageClassName: "local-storage"
  resources:
    requests:
      storage: 2Gi
apply看一下,成了
[root@master ~]# kubectl get pods -o wide
NAME                             READY   STATUS    RESTARTS   AGE   IP            NODE    NOMINATED NODE   READINESS GATES
go-microserver-74c85dd7f-8kzlh   1/1     Running   0          31h   10.244.0.21   node2   <none>           <none>
go-microserver-74c85dd7f-jlt4h   1/1     Running   0          31h   10.244.0.20   node1   <none>           <none>
go-microserver-74c85dd7f-m6wzl   1/1     Running   0          31h   10.244.0.20   node2   <none>           <none>
go-microserver-74c85dd7f-zntnr   1/1     Running   0          31h   10.244.0.21   node1   <none>           <none>
mariadb-0                        1/1     Running   0          12s   10.244.0.25   node2   <none>           <none>
[root@master ~]# kubectl get sc
NAME            PROVISIONER                    RECLAIMPOLICY   VOLUMEBINDINGMODE      ALLOWVOLUMEEXPANSION   AGE
local-storage   kubernetes.io/no-provisioner   Delete          WaitForFirstConsumer   false                  20s
[root@master ~]# kubectl get pv
NAME          CAPACITY   ACCESS MODES   RECLAIM POLICY   STATUS   CLAIM                 STORAGECLASS    REASON   AGE
mariadbdata   2Gi        RWO            Delete           Bound    default/mariadbdata   local-storage            23s
[root@master ~]# kubectl get pvc
NAME          STATUS   VOLUME        CAPACITY   ACCESS MODES   STORAGECLASS    AGE
mariadbdata   Bound    mariadbdata   2Gi        RWO            local-storage   25s


[root@node2 ~]# ll /data/sql
total 123328
-rw-rw---- 1 polkitd input    417792 Sep  1 00:17 aria_log.00000001
-rw-rw---- 1 polkitd input        52 Sep  1 00:17 aria_log_control
-rw-rw---- 1 polkitd input         9 Sep  1 00:17 ddl_recovery.log
-rw-rw---- 1 polkitd input       946 Sep  1 00:17 ib_buffer_pool
-rw-rw---- 1 polkitd input  12582912 Sep  1 00:17 ibdata1
-rw-rw---- 1 polkitd input 100663296 Sep  1 00:17 ib_logfile0
-rw-rw---- 1 polkitd input  12582912 Sep  1 00:17 ibtmp1
-rw-rw---- 1 polkitd input         0 Sep  1 00:17 multi-master.info
drwx------ 2 polkitd input      4096 Sep  1 00:17 mysql
drwx------ 2 polkitd input      4096 Sep  1 00:17 performance_schema
drwx------ 2 polkitd input     12288 Sep  1 00:17 sys
configuremap
保存配置的键值对,实现配置与应用分离
我们把yaml里面的env部分删除,把密码写进cm.yaml里面,部署看看
apiVersion: v1
kind: ConfigMap
metadata:
  name: mariadb-config
data:
  MARIADB_ROOT_PASSWORD: "123456"
apiVersion: apps/v1
kind: StatefulSet
metadata:
  name: mariadb
spec:
  serviceName: mariadb
  replicas: 1
  selector:
    matchLabels:
      app: mariadb
  template:
    metadata:
      labels:
        app: mariadb
    spec:
      containers:
      - name: mariadb
        image: mariadb:latest
        imagePullPolicy: IfNotPresent #只有当本地不存在镜像才从远处拉取
        env:
        - name: MARIADB_ROOT_PASSWORD
          valueFrom:
            configMapKeyRef:
              name: mariadb-config
              key: MARIADB_ROOT_PASSWORD
        volumeMounts:
          - mountPath: /var/lib/mysql/ #容器里面的挂载路径
            name: mysqldata #卷的名字,必须和下面一样
      volumes:
      - name: mysqldata
        persistentVolumeClaim:
         claimName: mariadbdata
可以看到容器成功起来了,如果这里没有指定密码的话,mariadb是起不来的
[root@master ~]# kubectl  apply -f  cm.yaml
configmap/mariadb-config created
[root@master ~]# kubectl apply -f mysql.yaml
statefulset.apps/mariadb created
storageclass.storage.k8s.io/local-storage created
persistentvolume/mariadbdata created
persistentvolumeclaim/mariadbdata created
[root@master ~]# kubectl get pods
NAME                             READY   STATUS    RESTARTS   AGE
go-microserver-74c85dd7f-8kzlh   1/1     Running   0          40h
go-microserver-74c85dd7f-jlt4h   1/1     Running   0          40h
go-microserver-74c85dd7f-m6wzl   1/1     Running   0          40h
go-microserver-74c85dd7f-zntnr   1/1     Running   0          40h
mariadb-0                        1/1     Running   0          5s
[root@master ~]# kubectl get cm
NAME               DATA   AGE
kube-root-ca.crt   1      2d10h
mariadb-config     1      3m14s
[root@master ~]# kubectl get cm mariadb-config -o yaml
apiVersion: v1
data:
  MARIADB_ROOT_PASSWORD: "123456"
kind: ConfigMap
metadata:
  annotations:
    kubectl.kubernetes.io/last-applied-configuration: |
      {"apiVersion":"v1","data":{"MARIADB_ROOT_PASSWORD":"123456"},"kind":"ConfigMap","metadata":{"annotations":{},"name":"mariadb-config","namespace":"default"}}
  creationTimestamp: "2022-09-01T01:47:05Z"
  name: mariadb-config
  namespace: default
  resourceVersion: "305952"
  uid: 16c011c0-7fce-4c3b-81de-1d131994eed3
secret
一些重要的数据,如密码之类的,可以用base64编码之后放在secret里面
apiVersion: v1
kind: Secret
metadata:
  name: mariadb-secret
# Opaque 用户定义的任意数据,更多类型介绍 https://kubernetes.io/zh/docs/concepts/configuration/secret/#secret-types
type: Opaque
data:
  MARIADB_ROOT_PASSWORD: MTIzNDU2
apiVersion: apps/v1
kind: StatefulSet
metadata:
  name: mariadb
spec:
  serviceName: mariadb
  replicas: 1
  selector:
    matchLabels:
      app: mariadb
  template:
    metadata:
      labels:
        app: mariadb
    spec:
      containers:
      - name: mariadb
        image: mariadb:latest
        imagePullPolicy: IfNotPresent #只有当本地不存在镜像才从远处拉取
        env:
        - name: MARIADB_ROOT_PASSWORD
          valueFrom:
            secretKeyRef:
              name: mariadb-secret
              key: MARIADB_ROOT_PASSWORD
        volumeMounts:
          - mountPath: /var/lib/mysql/ #容器里面的挂载路径
            name: mysqldata #卷的名字,必须和下面一样
      volumes:
      - name: mysqldata
        persistentVolumeClaim:
         claimName: mariadbdata

          # Secret 的所有数据定义为容器的环境变量,Secret 中的键名称为 Pod 中的环境变量名称
          # envFrom:
          # - secretRef:
          #     name: secretname
把configuremap下了换secret,statefulset配置也改一下,pod正常启动了
[root@master ~]# kubectl apply -f secret.yaml
secret/mariadb-secret created
[root@master ~]# kubectl apply -f mysql.yaml
statefulset.apps/mariadb created
storageclass.storage.k8s.io/local-storage created
persistentvolume/mariadbdata created
persistentvolumeclaim/mariadbdata created
[root@master ~]# kubectl get pods
NAME                             READY   STATUS    RESTARTS   AGE
go-microserver-74c85dd7f-8kzlh   1/1     Running   0          40h
go-microserver-74c85dd7f-jlt4h   1/1     Running   0          40h
go-microserver-74c85dd7f-m6wzl   1/1     Running   0          40h
go-microserver-74c85dd7f-zntnr   1/1     Running   0          40h
mariadb-0                        1/1     Running   0          7s
挂载为文件,这里就复制个例子
挂载后,会在容器中对应路径生成文件,一个 key 一个文件,内容就是 value,文档
apiVersion: v1
kind: Pod
metadata:
  name: mypod
spec:
  containers:
  - name: mypod
    image: redis
    volumeMounts:
    - name: foo
      mountPath: "/etc/foo"
      readOnly: true
  volumes:
  - name: foo
    secret:
      secretName: mysecret
namespace
类似于编程里面的namespace概念,我们可以把应用划分进不同的ns空间来进行分隔和管理
# 创建命名空间
kubectl create namespace testapp
# 部署应用到指定的命名空间
kubectl apply -f app.yml --namespace testapp
# 查询
kubectl get pod --namespace kube-system
示例
[root@master ~]# kubectl create namespace testapp
namespace/testapp created
[root@master ~]# kubectl apply -f goservice.yaml -n testapp
deployment.apps/go-microserver created
[root@master ~]# kubectl -n testapp get pods
NAME                             READY   STATUS    RESTARTS   AGE
go-microserver-74c85dd7f-46zwk   1/1     Running   0          21s
go-microserver-74c85dd7f-5qlxp   1/1     Running   0          21s
go-microserver-74c85dd7f-6dmqp   1/1     Running   0          21s
go-microserver-74c85dd7f-dhh9g   1/1     Running   0          21s
[root@master ~]# kubectl get ns
NAME              STATUS   AGE
default           Active   2d10h
kube-flannel      Active   47h
kube-node-lease   Active   2d10h
kube-public       Active   2d10h
kube-system       Active   2d10h
testapp           Active   53s